A stiff proposition
This is a technical article that will cover one important aspect of building a tandem.....the stiffener tube. Now, I realize that there are a lot of tandems out there these days that don't have stiffener tubes, including a sport model that we make. I will talk about why some tandems don't use a stiffener at the end of this article. For the high performance tandem rider, we feel that the stiffener tube is a huge advantage and this article will show you why.
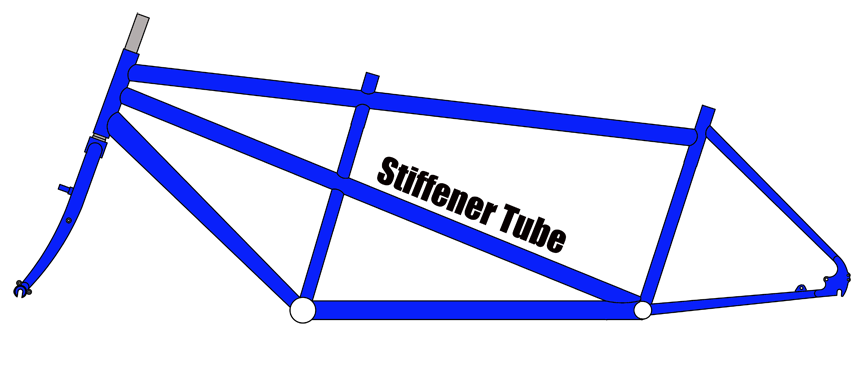
What is a stiffener tube?On modern tandems, the stiffener tube is the tube that runs from the head tube to the rear bottom bracket. See illustration below.
What is a stiffener tube for?
On a tandem, there's a lot of energy that ends up at the stoker's (back) bottom bracket. As both riders put in their effort, it adds up to a lot more (about twice as much) energy as on a single bike. Keeping that area of the bike from flexing side to side will make the bike ride more stable, and transfer more of your power to the drive train. On a tandem, something extra can be done to "stiffen" the back bottom bracket area to counteract this extra power.
Over the years, there have been several different designs the industry has used to incorporate extra tube(s) in order to stiffen the stoker's bottom bracket. I'm sure there could be a book on just that, but we're more concerned with the current design pictured above. This is the 'direct internal' design, and the one most commonly used today. Believe it or not, there are even different approaches to building within this specific 'direct internal' design.
One of these things is not like the other
 OK, let's delve even deeper into the world of tandem design and compare two different methods of integrating the direct internal stiffener tube design: the single miter, and the double miter methods.
To the right are two tandem frames that are identical in every way except one. Can you see the difference? If you have been in the tandem industry for decades, you'll see it right away, but most people can't see it.
To the untrained eye, they both look the same. One common thing that all direct internal tandems have is a lateral stiffener tube traveling from the head tube to the stoker's bottom bracket area. In order for the bottom bracket to flex from side to side, the seat tube and the keel tube have to flex, but now it also has to twist the stiffener tube. This provides a tandem with a whole lot more resistance to bottom bracket flex than without the stiffener tube. If you are a powerful tandem team, or you are riding with a lot of weight on the tandem, this is the best design for getting the most from your frame.
At Rodriguez, we aim to use education to sell our bikes rather than advertising. By the end of this article, you will be able to identify stiffener tube methods like a pro.....well, at least like a buff. Read on to see why Rodriguez customers love their tandems so much.
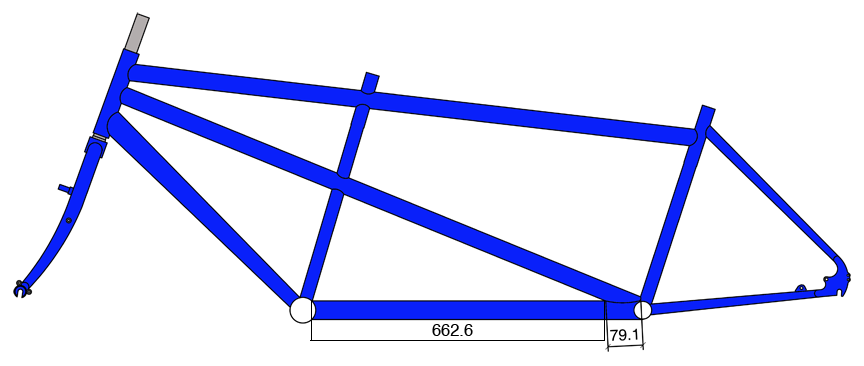
First Up: The Single Miter Design

As you can see, there is 38mm of stiffener tube contacting only the seat tube in this example. To the right is a photograph of an older Ibis tandem that just happens to be in our shop for some repairs as I write this article. It's a very good example of the single miter design that's used all through the tandem world. Once in a while, that small section of seat tube below the stiffener tube weld doesn't survive years of hard riding and starts to crack right where it's welded to the bottom bracket shell. I think that one contributing factor could be that there is more stress on that small section of tube because of the stiffener holding the upper portion from flexing....just an educated guess though. As a frame repair shop that specializes in tandems, people bring every make in here for repairs. Every so often, we'll have a tandem come into the shop with a crack in the seat tube/bottom bracket connection. These are always tandems using the single miter design.
Don't get me wrong, they don't all break, and this is certainly an acceptable design. It's just that once every few years or so, an old single miter frame comes in with a crack and that crack is always where the seat tube meets the bottom bracket.
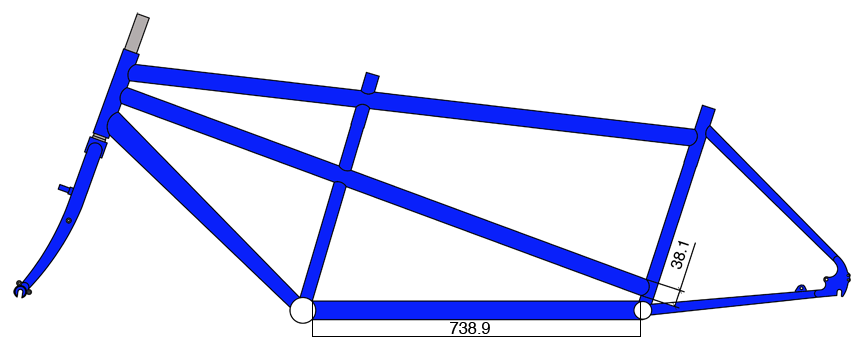
Next: The Rodriguez Double Miter Design

Benefit Number 1: More Power to You!
This combination results in our first benefit.....more stiffness in the stoker's bottom bracket, and this means more power transferring into the drive train! How much more? A lot more! Read on if you want to know the results of our scientific test.
Benefit Number 2: More Comfort for your Stoker!
At Rodriguez, we've always believed that the stoker's comfort is the most important component of your tandem. The biggest complaint that we get from stokers is that they feel that the 'stoker compartment' (the length of the bike between the 2 bottom brackets) is too short and their face ends up way too close the captains back. Other tandem manufacturers build their tandems with a stoker cockpit of 73cm or less. We find that this length only works well for stokers under 5' 2". Most stokers are actually more like 5' 4" and up, so if building a tandem to fit the riders, we end up well over 73cm. For instance, I just finished drawing a tandem with an 88cm stoker cockpit for a 5' 10" stoker.
"What does all of this have to do with the double miter method?" You ask? A whole lot. By effectively shortening the keel tube using the double miter method, we can get the efficiency (bottom bracket stiffness) of a much shorter keel tube. In the example above, the stoker's cockpit length is over 74cm, but the bike has the efficiency of a tandem with a 66cm keel tube.
It's not just theory:
The tandem industry is competitive, and saving time is saving money. Several years back, we wanted to know if it was worth continuing to build using the double miter method, so our head frame builder conducted a test. Since a stiffener tube is supposed to eliminate flex, the test was to determine the amount of flex that the double miter design resisted versus the easier to build (less expensive), single miter design. He built one tandem frame of each design, but identical in every other way. He then put the frames, one at a time, onto the frame table and isolated the captain's bottom bracket and the rear triangle. Then, he applied weight to the stoker's bottom bracket and measured the difference in deflection (amount of movement) towards the table with a digital caliper. The difference turned out to be 27% less flex on the double miter. Now, this test doesn't mean that you'll have 27% more power, it simply illustrates that all other things being equal, the double miter design is significantly stiffer at the stoker's bottom bracket. We continue to build most of our tandems in this design even today.
There are other things that we do here at Rodriguez to stiffen the stoker's bottom bracket, but that's a whole different article. Sometimes it's hard to convey the differences, but rest assured that we here at Rodriguez feel that a little extra time is worth it if our customers get something extra for it. Thanks for reading, and we hope that this article gives you a better understanding and appreciation of the design work that goes into tandem building.
Finally: How a bout just eliminating the stiffener all together?

A 2002 Burley Zydeco Tandem uses no stiffener tube at all

A 2003 Co-motion Periscope 'Family Tandem'

2005 Rodriguez Toucan ST
The first reason was cost
It's less expensive to build this way as it requires a lot less labor and less materials. The first of the modern era tandem manufacturers to use this method was Burley. I'm sure there were many others through the years, but most people reading this will be most familiar with manufacturers that made tandems in this millennium.
The Burley tandem company focused on affordable tandems through the 1990's and early 2000's (eventually going out of business in 2005 or so). They mostly built entry level sport/touring tandems. We sold Burley tandems here in our shop for many years as they were a good option for someone who did not need the performance level of a Rodriguez. Sometime in the 1990's they introduced a very low-end model called the Zydeco. They took their least expensive frame design, and removed the stiffener tube. We didn't sell the Zydeco, as it was not something that our customers wanted, but none-the-less, it was a tandem that was cheaper partially because it eliminated the stiffener tube and the labor entailed to build with one.
Imitation is the greatest compliment
After proving that a stiffener tube wasn't necessary for everyone, and that the lower end tandem market was viable, others joined the party.
Co-motion introduced their Periscope tandem around 2003 as a low cost 'family tandem'. This tandem also eliminated the stiffener tube as a cost saving measure. This tandem is still around today.
In 2005, after Burley exited the scene, we introduced the Rodriguez Toucan ST as our entry level tandem. In our case, the bike was originally designed and produced for the 'Pedaling for Parkinson's' program, but quickly became a favorite with those who wanted a lower cost sport tandem. The lower end market was booming with no Burley around, so this model quickly became a standard here with us.
The second reason is weight savings
Obviously, a tandem without a stiffener tube is safe to ride. It also stands to reason that if all other things are equal, removing one of the tubes makes the overall frame weight lighter. Both of these statements are true. The acceptance in the industry of tandems without stiffener tubes has given rise to trying to lighten up a tandem by leaving out the stiffener.
Over the last decade we've seen a lot of manufacturers racing to make the lightest tandem, and sometimes performance takes a back seat to that 'weight savings at all cost' attitude. We've seen the return of exotic materials to the market, and some of these materials are stiff. The theory goes like this: "if we build a tandem with stiffer material, we don't need a stiffener tube." In reality, you don't even need stiffer material, as the Burley Zydeco proves. The question is, are you getting as much efficiency from your bike as you could be? Is the trade off of power transfer to weight worth it? In some cases it is. We've built our Rodriguez uber-light tandem without a stiffener tube on occasion and the results are impressive on the digital scale. We can save 17 ounces by eliminating the stiffener tube on that model (more like 22 ounces for the heavier models). For a small, light tandem team that will not load the bike with any weight, this is great, especially if they are 'spinners' and don't stand when climbing hills. For a couple the size of my wife and I, we much prefer to climb with a stiffener tube on the tandem. We like to stand on hills and have the bike stay straight and the power go into the drive train. We could certainly ride without a stiffener tube, but that 17 ounces is worth it for our style of climbing. So, certainly there are customers for whom a high performance, no-stiffener bike is a fine choice, but most of our Rodriguez customers prefer the added efficiency of that extra few ounces (you may see some of them rocketing up the hills around Washington State).
How much deflection would a non-stiffener tube frame have? I don't know. When we conducted the test, we only used 'double miter' and 'single miter' frames as samples. Any high-end tandem of that day had a stiffener tube and we didn't even consider trying a 'non-stiffener' tube frame. I think that it would be more than 27% difference though if I were to make a hypothesis.
It boils down to this:
Regardless of the material, all other things being equal, a stiffener tube adds stiffness to the stoker's bottom bracket and a double miter stiffener adds even more. If you don't need that efficiency, then you're carrying around about one pound of extra weight on your tandem. But, if you're fairly strong or you carry a lot of extra weight on your bike, you're sacrificing hill climbing efficiency to save that one pound.
OK then. If you're still reading this I commend you, and deem you at least a buff level stiffener tube enthusiast. I hope that you have learned something and that you now have a better idea if you want a stiffener tube in your tandem, and if so, what to look for.
Thanks for reading - Dan


