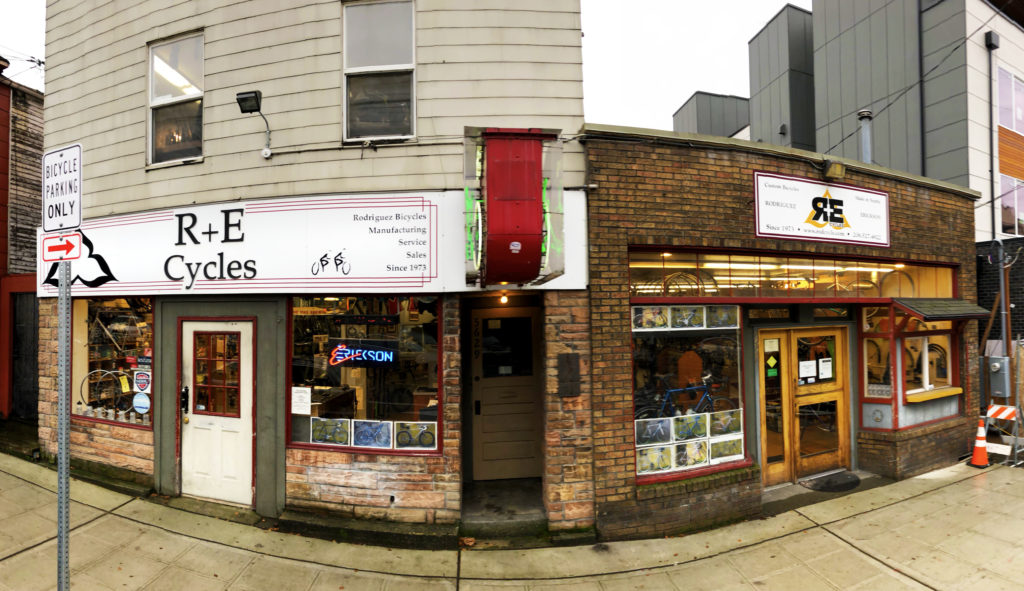
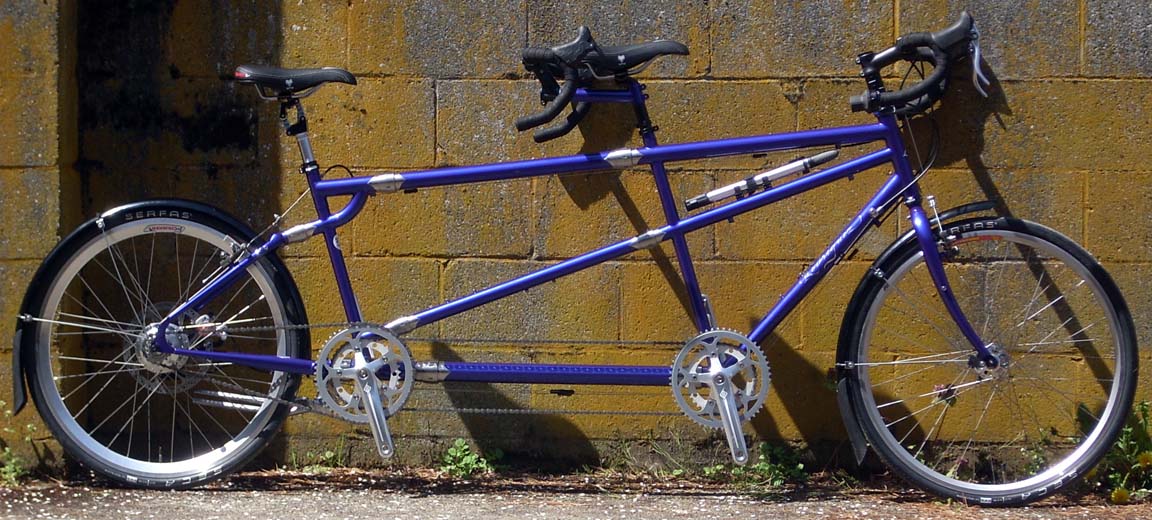
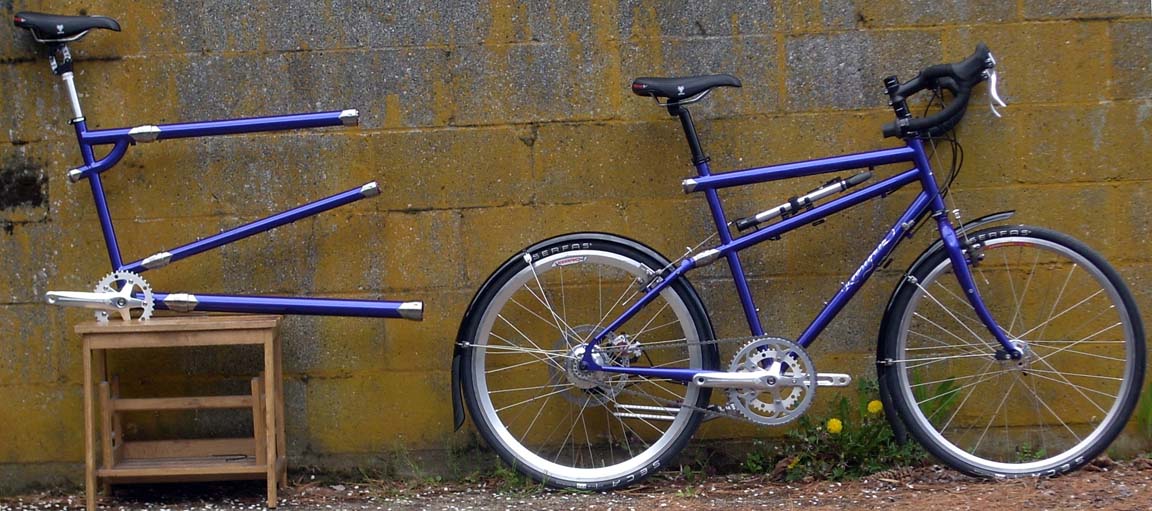
2019 looks great at R+E Cycles

Things are busy at R+E Cycles. 2019 has arrived with the frame shop busier than any January in recent memory. New bike sales are through the roof and we are scrambling to do all the projects we would normally have time for during the winter. This is a good problem to have, and we are thrilled to welcome so many new riders into the R+E family. We have a lot on our plate this year. Here are a few things to keep an eye out for:

  • E-Bike Evolution: E-Bikes are big these days and we only want the best for our riders that choose to go electric. There’s a lot of choices out there and our aim is to strike the best balance between performance, cost, and service. This is in addition to building a custom bicycle that’s perfect for the rider. We want you to have a bike that fits perfectly, rides well, and has parts we can service and warranty without issue. That last one has been tricky due to a constant change in the industry, but we’ve made headway towards finding options that work. If you’re interested in an E-bike, why not make it a Rodriguez E-Bike? Stop by and chat with us. We’d love to hear what your needs are.
  • Tandems Everywhere: We’re selling more tandems than ever! We’re pretty sure it’s because we build the best tandems on the market, and it looks like a lot of people out there agree. Look out for some upcoming articles about our tandem building philosophy and process, and be sure to check out our 2019 Rodriguez tandem models.
  • Bike and Pike Open House:

    Our 11th annual party is just around the corner on February 23rd. This is usually our season kick off, but the season seems here already. That’s okay, we can still have a party with some our favorite local bike-related businesses and raise a boatload of money for Food Lifeline.

  • Our Semi-Secret Project: We’ve been working on our own little development project here at R+E. This project should be of particular interest to tandem riders and anyone with difficulty shifting normal shifter configurations. We will make a formal announcement once all the pieces fall into place.
  • New Faces: We’re taking on a couple of new employees to help out with all of this stuff. Hopefully you’ll be able to come by and meet them at Bike and Pike!

This is just the start of what should be a busy year for R+E Cycles and Rodriguez Bikes. We’re riding high into our 46th year and we hope you can be part of the ride.


What’s keeping you from buying a bicycle built for 3, 4 or 5??

One of the most visited pages on our website over the last year is our Xtra-long bike page. There’s not many manufacturers that make bicycles for 3 or more people, and for some reason, there’s a lot of families interested in them right now.

Even with all of that interest, some people have a hard time committing to owning one of these creations. There are a few obstacles that can make these bikes impractical to own. These were all things that I struggled with too before I designed the Xtra-long bike that my family rode for 6 fun years. I thought I should share my experiences and let you all know why we make our Xtra-long bikes the way we do. There are some Rodriguez differences that can save you thousands of dollars. If done right, your experience can be amazing, and can create great bicycle memories for you and your family to look back on. I know this personally.

So, let’s get down to business. Here’s the objections most people have to actually jumping in and buying one of these bikes.

1.) How do I store it?
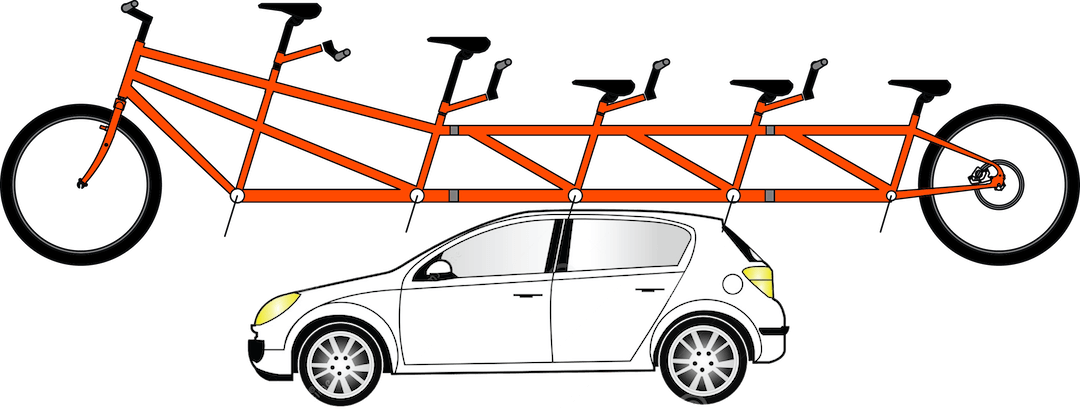
A bicycle built for 3 is too long to hang on a ceiling hook. One built for 4 or 5 can be up to 15 feet long. Where’s that going to go?

2.) How do I transport it?
There are lots of ways to transport a single, or even a tandem. But a triple, quad, or quint is so long that it won’t fit on top of a car or in the back of a pickup truck.

3.) It’s such a specialty bike. Will it get ridden enough to make it worth the price?
Most people who want a triple, quad or quint already own single bikes and a tandem. So, adding another expensive bike that will only be ridden if all parties are available seems impractical.

bicycle built for 5 on top of a car


You can benefit from our experience

After years of building bicycles for 2, 3, 4 and 5, we’ve learned a thing or two. We are one of the oldest, if not the oldest, of the Xtra-long bicycle manufacturers still building in the U.S.

My family rode a bicycle built for 4 for several years while my kids were young, so I have a lot of experience in the subject. These are all things that I struggled with before we built our quad. The solution: S&S couplers and some Rodriguez ingenuity.

Let me tackle these obstacles one at a time.

1.) Storage: This one is very easy to solve. Every Xtra-long Rodriguez includes at least enough S&S couplers to take the bike into 2 parts quickly and easily. Having two halves makes storage much easier (take it from someone who knows). There is no extra charge on our Xtra-long bikes to have this feature.

2.) Transporting the bike: Another huge benefit for the S&S couplers in your new Rodriguez Xtra-long bike is transporting it. In my case, I simply took the bike in half (takes about 2 minutes), and was able to easily fit it in my little clam-shell style tandem hauler. I could fit the whole quad in there, as well as my road bike, the kids bikes, and all of our luggage for any trip we took. If I didn’t want to use the trailer, I could easily haul the bike as a tandem on my tandem rack, and the other 2 sections were small enough to put in the back of the van behind the rear seat.

Having enough couplers to take the bike into 2 parts is a must for all of our Xtra-long bike customers, and that’s why we include at least enough couplers for that to happen at no charge.

3.) It’s such a specialty bike, will it get ridden enough?
This is certainly an important consideration for most families, and was for us as well. Truth be told, if I would’ve just built a quad for our family, I don’t think it would have been ridden enough to make it worth it. Sure, we could’ve saved a little money up front, but it would be really expensive in the end. Read on…


S&S couplers, strategically placed, can make your Xtra-long bike quite manageable


This is where Rodriguez ingenuity really comes in. I designed our bike to be easily convertible from 2, to 3, to 4 in just minutes. Here at Rodriguez, we have a staff of rare birds, so anything is possible. The frame shop team can build just about anything, so this was no challenge at all to build.

This turned out to be the best money spent. As it turned out, most of the riding we did on this bike was done as a tandem. Even on vacation, I left the bike set up as a tandem and we did morning rides as a couple. Then, if the weather was good, and the kids wanted to ride, I made it into a quad. We could do a leisurely family ride into town and have ice cream. If one kid preferred to stay at Grandma’s house instead of riding, we left that section out of the bike. It was like owning a tandem, a triple and a quad, but a lot less hassle (and expense).

The Wrap-up and Recommendations

Make sure your Xtra-long bike is a vacation bike
Had we just built it as a quad only, then I don’t think I would’ve bothered taking it on vacation with us. The tandem is a must, as are the single bikes. So, how would I take all of those bikes, as well as the quad? Answer: I wouldn’t have. That would’ve been a shame, because it turned out that the most fun we had with this bike was on vacations.

Instead, it went on every vacation we took from 2006 ~ 2013, and was ridden in some configuration just about every day on those vacations.

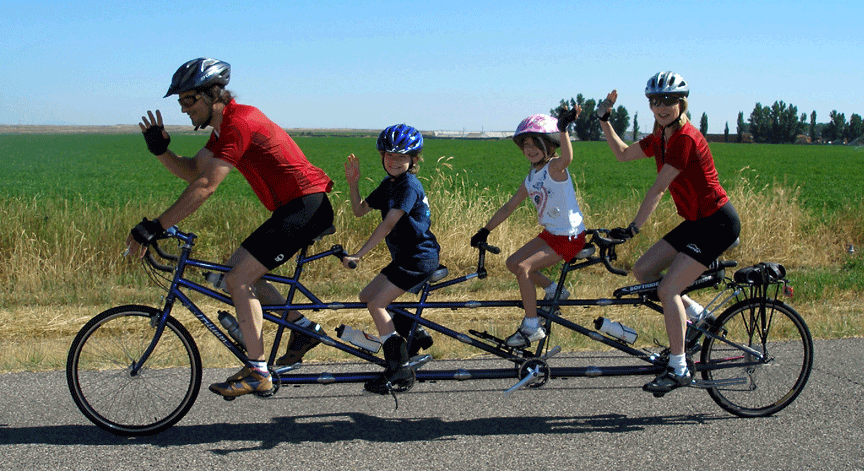
Riding into Rupert, Idaho for the 4th of July parade on a quad was a blast for us and the kids. Believe me, cars slow down when they see a quad, and they usually roll the windows and start asking questions (which the kids love to answer). Riding through the Idaho farmlands as a family ‘racing’ Grandma and Grandpa on their tandem made for some lifelong memories. Then, while Grandma and Grandpa kept the kids for a few days, Marcie and I could take the tandem and spend the time in Sun Valley riding the trails up there.

Bicycle built for four people


Riding into Rupert for the annual 4th of July parade in 2007. Photo Courtesy of Grandma Sally

At home, we left the bike as a tandem for our morning rides. It was our only tandem. We didn’t need multiple bikes. On weekends through the summer, I often put it back into quad mode and we went for an evening ride. Again, ice cream, dinner, coffee shop, you name it. Riding with the kids is quite a bit different than the 2 of us riding as a couple.

Had I built it as a quad only, this would’ve been the only riding it ever got. Instead, it got ridden several times per week as a tandem, occasionally as a quad around town, and almost every day of our vacations. Like we say, a bicycle that gets ridden is a happy bicycle.

Would we do it again?
Yes, absolutely! Our kids have outgrown the quad, and it was sold in 2014 for someone else to enjoy. But the memories live on. The only thing I would’ve done differently is that I wish we would’ve done it 3 years earlier. Having 3 more years to enjoy the family quad rides would be something we would cherish. That being said, I really loved the 6 years we had on the bike, and if it’s in your budget, I highly recommend it.

Back on Point
Obstacles to owning an Xtra-long bike: As you can see, all of these obstacles can easily be overcome here at Rodriguez. It might cost a little more up front, but it certainly saves a lot of money to have one bike that can serve as your everyday tandem, your vacation bike, as well as your Xtra-long family bike. Not to mention the added bonus of strorage and transportation.

Thanks for reading, and I hope this clears up some of those nagging questions so you can go ahead and order your Rodriguez Xtra-long bike 😉

Thanks for reading – Dan – 2017

The New Rodriguez Bandito


The Lightest Road Bike with Disc Brakes!

Unleash the Beast!

For a decade now, we here at Rodriguez have been known for building some of the lightest bikes on the road. The amazing thing about these bikes is that they are made of good ol’ American steel! Well actually, they are made of the New American Steel. In 2006 we introduced our 13.5 pound Rodriguez Outlaw. That led to mass retirements of Trek Madone’s, Cervelo R3’s, Specialized Tarmac’s, and many many other overseas-made carbon frames. We love the look on people’s faces when they lift the Outlaw for the first time. Especially if they rode in on something they thought was ‘really light’.

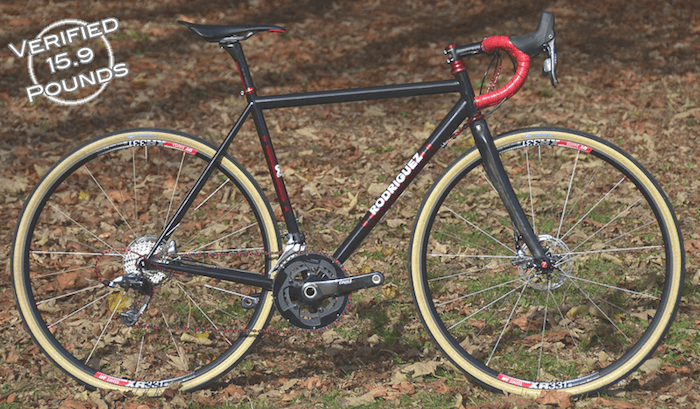
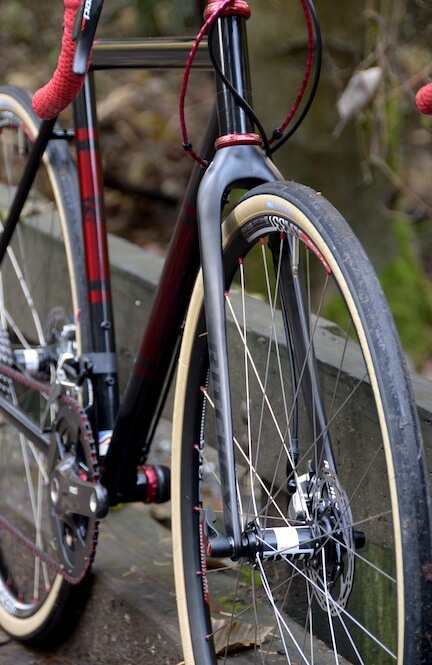
Well, now we’d like to introduce something else equally spectacular. The Outlaw has a new cousin equipped with disc brakes, the Rodriguez Bandito. It took some time, and some planning to get this bike down to it’s fly-weight of just 15.9 pounds, but we’ve done it. The lightest disc brake bikes that we’ve been able to verify weight on are at least 2 pounds heavier than the Bandito.


“The Rodriguez Bandito offers the serious weight weenie some never before seen features available on a fly-weight disc brake road bike!”


Custom Steel bike with disc brakes by Rodriguez


Verified 15.9 pounds with disc brakes and 32c tires!

First up: 32c Tires

Now here’s an idea. One of the benefits to disc brakes on a road bike is that the brake caliper no longer limits your tire width. So, if the frame and fork are designed properly, you can put wide tires on your bike. Unfortunately, race bike manufacturers don’t realize that most ‘everyday’ riders would like this ability, and design their forks and frames for the same skinny tires that you could run with caliper brakes:-( We ask “where’s the fun in that?!”

The Bandito is the first ultra-light disc brake road bike designed for use with wide tires. As a matter of fact, we even did the weigh in with 32c tires on the bike. You can run up to 35c tires on this bike. We see the ability to run wide tires as the most important advantage to road disc brakes. Otherwise, why pay the weight penalty?

Next features: Lighter, more comfortable and more durable than your carbon bike

Now you won’t have to compromise weight, ride quality, comfort, or durability to own the sweetest ride in the pack. The Banditio comes with our lifetime warranty, just like all of our steel bikes (most carbon bikes have just 5 year limited warranties). Steel has a well deserved reputation as the smoothest riding material, but also is thought of as heavy:-( This is because most of us owned heavy steel bikes back in the 1970’s, and we associated the ‘heft’ with the frame material. We loved the ride, but were willing to sacrifice that smooth ride to save a few pounds on aluminum or carbon fiber. Well, steel has evolved, and now we can make a Rodriguez from steel that’s lighter than it’s carbon or aluminum counterparts. Some of you are probably ready to email us and schedule a test ride…right? Others out there, I know will be reading this and thinking “Bull Sh#$%” right? Well, read on then. I’ll explain a few things that will help you understand how we can pull this off.

Use your head:
Let’s talk about head tubes and head sets. This is the part of the bike where the fork is attached, and the bearings are referred to as the head set. Originally, carbon fiber bikes used the same sized head tubes and ISO head sets as titanium, aluminum and steel bikes. This part of the frame is under more stress, and carbon frames began to fail at this point. So, manufacturers began to ‘beef up’ this part of their carbon frames. Unlike aluminum, titanium and steel frames, it turns out carbon frames needed more material in this area in order to have the strength needed. To fit these bigger head tubes, bigger, non-standard head sets were used, and sometimes a proprietary fork. The issues of non-standard, or proprietary parts are many, but one thing is for sure. The bigger head tubes and head sets, and proprietary forks may have made the frame weight lower, but added weight to the full bike when built.

Bottoms up:
Now, let’s talk about bottom brackets. This is the part of your frame that holds the bearings for your cranks. Needless to say, this is also also weak point on a carbon bike. It’s a point of great stress on any frame. To fit the ultra-light, standard ISO bottom brackets that are used in steel, aluminum and titanium bikes, the carbon guys had to glue in a steel or aluminum shell so they could put threads in it. This added weight to a carbon frame. This was also a weak point as eventually the glue failed. To solve the problem, the carbon guys again abandoned the long held ISO standards, and adapted one of several different non-standards. Again, the frame had to be ‘beefed up’ and a heavier bottom bracket had to be used.

Let’s compare:
This brings us to an interesting point. Wether intentional or not, these evolutions artificially make a carbon frame seem lighter than it is. If one weighs just the carbon frame, without it’s required heavier bottom bracket and head set, the frame can be a little lighter than our steel Bandito. So a published frame weight is not the only thing to look at. If one weighs the carbon frame with it’s fork, required head set, and required bottom bracket, the result will be quite different. You see, an ultra-light Rodriguez steel frame, you can still use ultra-light ISO standard parts. This means that you can run much lighter head sets and bottom brackets, and in some cases forks. The result is very similar weights, or often, a lighter combined weight for the Rodriguez ultra-light.

So, no more weighing just the frame. You need to weigh the entire bike, or at least the frame with it’s bottom bracket, head set and fork to get a real comparison. If you do that, you’ll find the secret behind the Rodriguez ultra-light steel bikes like the new Bandito.

Added weight for no reason:
When designing the Bandito, we weighed a larger head tube and head set like the carbon bikes run. A lot of steel bike manufacturers run these, but I have no idea why. For instance, the weight difference between an ISO head tube set up and a 44mm head tube was just shy of 1/2 of a pound! On a steel bike, that’s completely unnecessary added weight, as a steel frame is strong enough without all of that ‘beef’.

Then, add to that the larger bottom brackets. The added weight again would be wasted on a steel frame, but none-the-less, a lot of steel bike builders use them.

If a steel bike has these larger head tubes, head sets, bottom bracket shells, and bottom brackets, it is a pretty heavy frame, and a really heavy bike. But, we don’t don’t use that stuff. I would put our ultra-light steel bikes up against any fly-weight on the market of any material.

In closing I’d like to say, if you love really light bikes, and you haven’t ridden a custom, American hand-made Rodriguez ultra-light, DO before you spend money on a carbon frame mass-produced overseas. If you already own a carbon bike, we challenge you to come in for a ride…but be careful…most who do wind up on a Rodriguez.

Thanks for reading – Dan 11-2016


Related Articles


Weight a Minute – Honesty in advertising
Steel vs. Carbon – Steel CAN be lighter
Chaos – Downside to abandoning ISO standards
The New Carbon… Carbon Steel!
Forever Bike – Proprietary parts 🙁

Just Sit On It!

This article was written Feb. 6th, 2015. Prices quoted reflect that date, and may have changed if you are reading this at a later date.

Visit us online at rodbikes.com

Bodyfloat Seat Post Installed and Adjusted • Just $250 at R+E Cycles • (206) 527-4822

What do the roads you ride feel like?
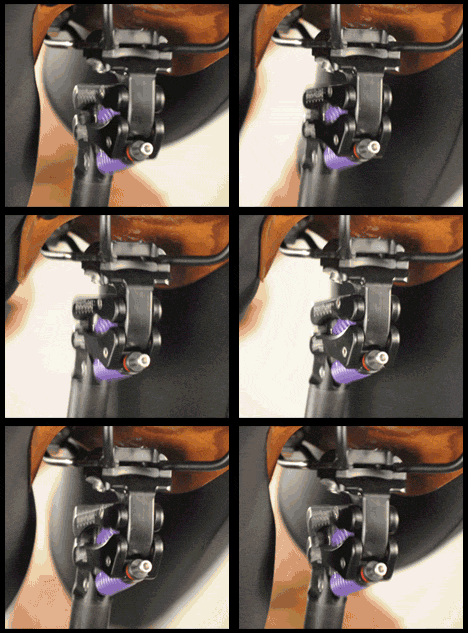

Do you find yourself having to stand up frequently over cracked, crumbling asphalt on your rides? How about you commuters? Is your expletive quota reached on just about every commute? I’m sure that you’re hoping for the city to fix the road, but that’s just wishful thinking now, isn’t it?

Now you can ride in comfort and quiet while sitting on your bicycle seat. “Surely you jest!” you’re thinking to yourself right now, but I’m not. Let me fill you in on the secret we’ve discovered.

Suspension seat posts have a long history, but most people think of them like we did….only worth using on the back of a tandem. That was before the Bodyfloat seat post.

If you would like to make a comfort upgrade to your bicycle that really works, and is high performance, this article is for you. Let me take you on a short journey into the world of suspension seat posts and show you where it is now.

First, a little history:

Early Attempts at Comfort:


As the Nation’s oldest tandem manufacturer, we’ve got a long history with every suspension style seat post imaginable. All the way back to the early Hydrapost, suspension seat posts have been added to almost every tandem we’ve built. Stokers (the person on the back of a tandem) are not aware of upcoming bumps unless the captain (the person up front) warns them in advance. Needless to say, there are lots of times when that does not happen, and the stoker feels the full force of the bump. So, tandem manufacturers like us have always tried to use a seat post that would mitigate this problem a bit.

The first designs were to try to make the seat post into a shock absorber. While a few of these seat posts were somewhat effective, they were not really the kind of product that anyone wanted to use on a high performance single bike. They were heavy, and only provided some ’emergency’ relief for that ‘whoops I forgot to warn you on that one’ situations. They basically worked like a pogo stick built into the seat post. One problem with this design is that your seat tube is at an angle (usually 73° from the ground or so), but gravity is trying to pull your body down at a 90° angle. This creates a lot of what’s been called ‘stiction’. Basically, the shock absorber is stuck in place until you hit something violent enough to break it free. When it breaks free, it drops, but then returns with great force (like a pogo stick). Kind of a delayed reaction with a slightly dampened energy return. In the absence of any other designs, these were used for several years.

You still see these seat posts all over on ‘comfort bikes’. They are very inexpensive these days, but don’t really work very well.

Comfort in the 1980’s and 1990’s
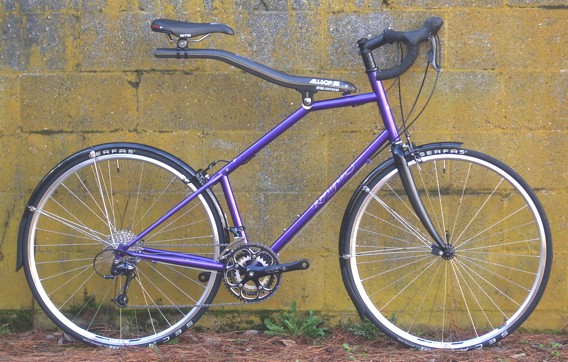

The first product to really work well was the Alsop Softride beam. This was in standard use on many brands of tandems for the stoker position for almost 20 years. We also built a lot of single bikes for the beam through the 1990’s. It required a special frame design, with special braze-ons and lots of specific parts. So, it didn’t really take off too well as you couldn’t easily add one on to your existing bike. When used though, this product did exactly what it was supposed to. The beam dropped a little bit with the riders weight (straight up and down and not at the 73° angle). When the rear wheel dropped into a rut, the rider stayed at the same height. Like the suspension in a car, the wheels could go up and down, but the rider didn’t feel the impact. No sticktion, great suspension, but your bike had to be custom made to work with the design. My wife and I ride a tandem with a Softride beam to this day. She swears by it, but the company is now gone.
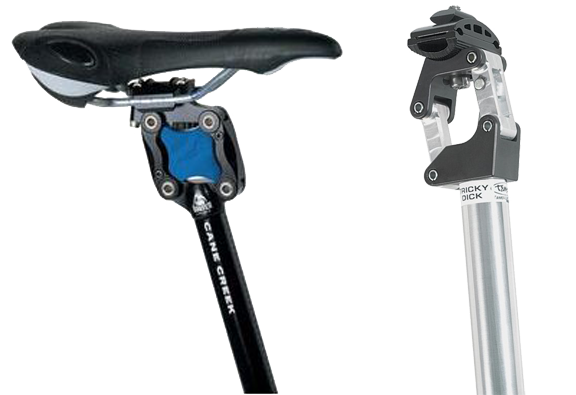

After the Softride company went out of business, we were stuck with various seat post designs to try and provide some relief to stokers. The shock absorber version was not so good, so we tried some of the parallelogram designs that were out. These tried to take the stiction away by attaching the seat to a parallelogram and allowing the rider weight to raise and drop straight up and down like the Softride beam did. The problem that we ran into with them was that the ‘falling rate’ of the spring design was wrong. You could say they were built backwards. The spring was strong when the seat was at the top, and got weaker as the seat moved downward. So, if a bump was hard and the seat post began to drop, the rider would end up all the way at the bottom of the action. Then they would have to lift their weight back off of the seat to get the seat back up because the spring was too weak to actually lift the rider.

Even with their imperfections, we were limited to use these for the stoker positions of many tandems. Some people used them on single bikes, but like I said, these designs were not very high performance. For those who wanted something incredible, the wait was almost over. In 2013, the answer would arrive in the form of the Bodyfloat.

“OK Dan! Bring it in to this century already!”

In 2013, one of the guys who worked on the design for the original Alsop Softride beam visited our shop. He brought with him a new seat post design that he was very excited about, the Bodyfloat. He did a demonstration install/setup for Scott (our shop manager) on his personal bike. It was near closing time, so Scott rode the bike home with the post in it, and then he rode it back in the next morning. He said to me “I’m buying that seat post, and leaving it on my bike!” That’s a testament to the performance of this new post. Scott has ridden every suspension post available, and never thought he wanted one on his personal commuter. This post changed his mind.
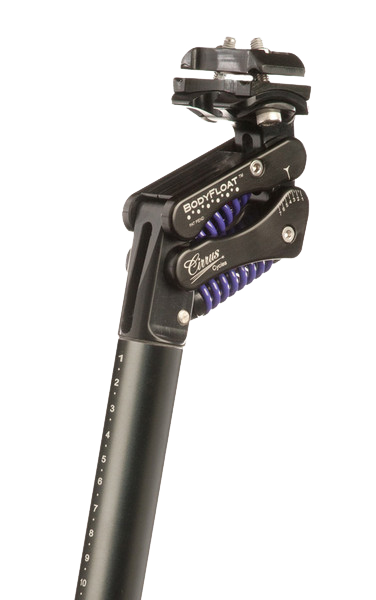
The 2015 Bodyfloat Seat Post Just $250 at R+E Cycles We were so excited about the new design that we invited the Bodyfloat representative to display his post in our Bike and Pike event last year to show our customers his new product. It was an immediate smash hit, and several of our customers ordered them for not only their tandems, but their single bikes as well. Then, just as quickly as it took off, they couldn’t produce them fast enough for our demand. We spent several months without them. I was kind of bummed out because I wanted to try one on my own bike. Well, good news. They figured out their production issues, and now they are readily available, and 40% less than they were a year ago! The original version was Titanium at $425, but the new version is aluminum at just $250. The Ti version is still available for the rider that needs a super long seat post.

The Bodyfloat works on a different principal than all other suspension seat posts before it. Instead of having a falling rate design, it has a ‘rising rate’ design. The Bodyfloat springs are lighter at the top, and gradually get stiffer as the seat drops. No more having to lift your self off the seat to raise the seat back to start position. It also drops just slightly as your weight sits onto the post like the old Softride beam design did. The wheels can drop in and out of bumps while you, the rider, stays stationary in space.

I have since installed one on my bike and had the same experience as Scott. I will keep it on my bike, and I’m considering installing one on the Captain position of my tandem as well. It’s amazing how I can only hear the bike hitting the small bumps and cracks in the road, but I do not feel them anymore. I have to say, I’m impressed!

I can talk until the cows come home, but maybe you should just come to the shop and try one for yourself. Give us a call at (206)-527-4822 and set up a time to come by with your bike and your riding gear. We’d be happy to set one up for a test ride.

Not exactly ‘Plug and Play’

The Bodyfloat does need to be adjusted to your weight and riding style by a professional. Not to worry though, we’ve been trained in the proper set-up and will do it for you for FREE with purchase of a Bodyfloat! Free is a very good price.

“But…but…wait! I ordered one online and it’s not set up for me.”

If you’ve already ordered one online, or from someone eles who didn’t set it up for you, no need to worry. We can set it up for you for just $25. Just call us for an appointment.
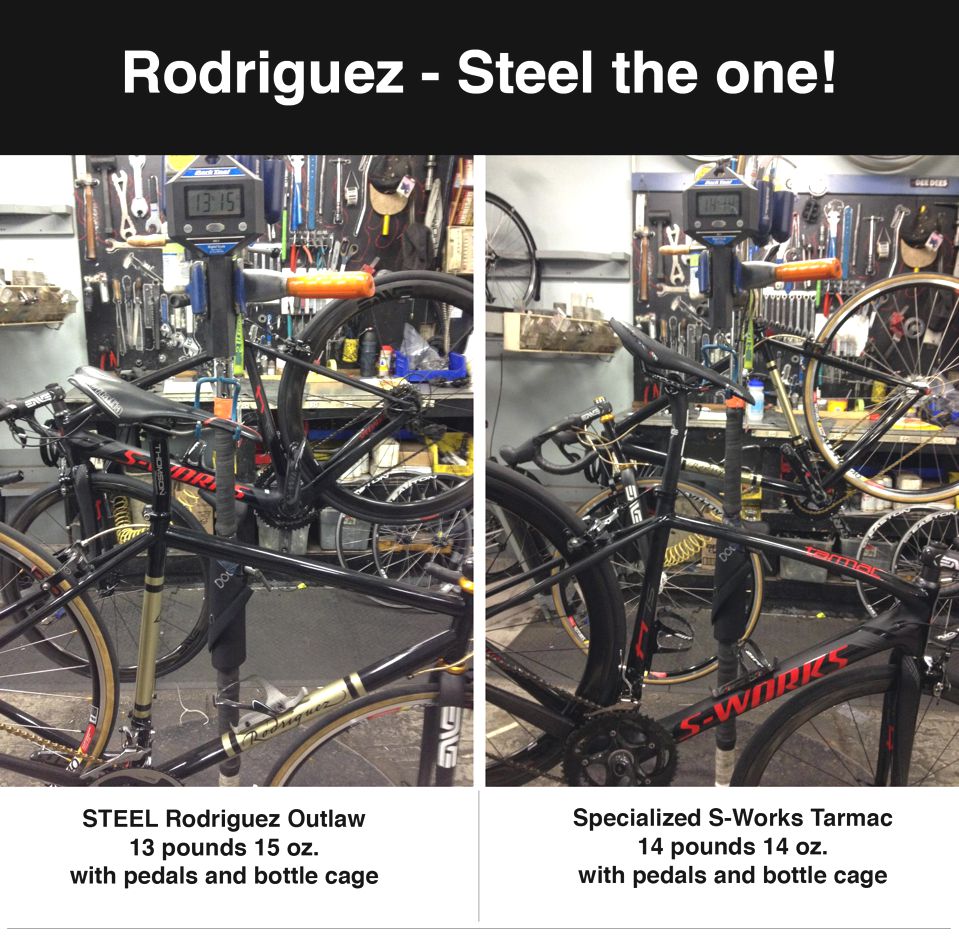
Steel Rodriguez Outlaw vs. Carbon S-Works Tarmac

Steel bikes don’t have to be heavy, and here’s proof!

As many of you know, we have one of Seattle’s largest bike repair shops and we service every make and model of bicycle. As a high end bicycle manufacturer (Rodriguez and Erickson), we have become the ‘shop of choice’ for folks who ride high end bikes of every make. It’s always fun to weigh the high end bikes that come through our repair shop. Even though I’ve written a lot about the fact that our Rodriguez Outlaw is the true featherweight, some people still think that a steel bike has to be heavy.

So….a picture is worth a thousand words right?


The Shootout – Who’s the Real Featherweight?

Steel Rodriguez Outlaw vs. Carbon S-Works Tarmac


The other day, a Specialized S-Works Tarmac came through our busy repair shop, and we had the chance to put it up head to head against our Rodriguez Outlaw on the same scale. The results were not surprising to us, but to anyone who thinks a light bike has to be made from carbon fiber, the results are probably quite shocking. One of the mechanics snapped the shots below with his phone, and texted them to me.

I put together a quick Facebook post of the images and our website lit on fire! Apparently, there were some recent newsworthy events (like a New York Times article for one) causing cyclists to take a second look at U.S. made steel bikes. As it turned out, this post was well timed. As a result, there are a lot of folks out there investigating light weight steel frames to replace their existing carbon frame. You might be surprised to learn that we’ve been converting people to lighter weight steel for several years now.

Anyway, back to the photos. Below is a side-by-side shot showing exactly what the 2 bikes weighed on the same scale, on the same day.

Now you can have the perfect blend of ride quality and durability of steel in a custom hand made bicycle, and not have to sacrifice on weight. You don’t have to sacrifice on anything I suppose. The Rodriguez Outlaw is custom made in Seattle USA from True Temper S3 tubing. Every frame is built specifically for its owner, and can have any color you want. The Outlaw rides like a steel bike because it is a steel bike.

It’s as light or lighter than any high end carbon bike made overseas, and will serve you for a lifetime of cycling as it’s not going to wear out. You’ll feel more confident on the downhills, and this frame climbs like a rocket! Just ask Steve if you don’t believe me!

Thanks for reading, and please share this article if you know someone who might be interested.

Links inside this article:

The Original Tandem to Single Bike Convertible

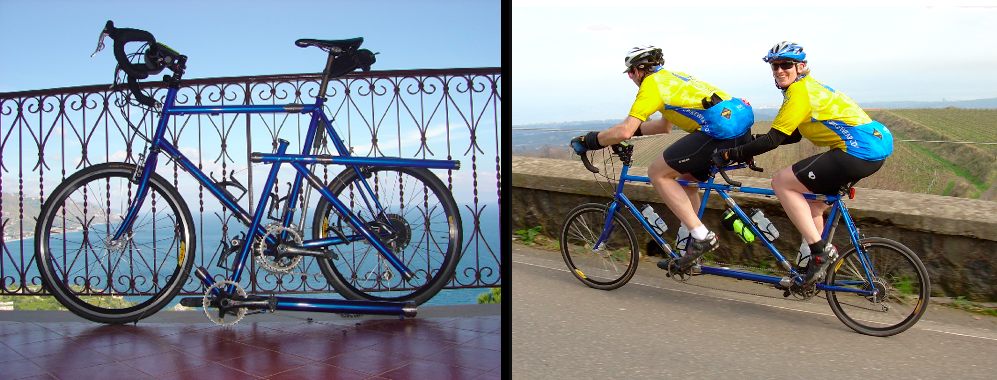
“A Bicycle built for two….I mean one….I mean two”

They say imitation is the greatest form of flattery. If that’s true, then I’m not sure how to take the fact that it took 17 years for another company to imitate our unique Rodriguez 8-ball design.

Last week, a couple flew in to Seattle to visit our shop. They had recently attended a trade show where a manufacturer was displaying a tandem design that, through the use of S&S couplings, could convert into a single bike. Not only that, but when asking around, they discovered that even another company was talking about introducing a similar design. Now, as you may or may not know, we don’t attend trade shows anymore, but none-the-less I was surprised after all these years to hear that other companies were attempting this challenging design. After noticing that the hits on the Rodriguez 8-ball page were about 20 times their norm, I thought a blog post was due.


Mike and Angela
kick into high gear on their 2005 Rodriguez 8-ball


Evolution with intelligent design:
The first Rodriguez 8-ball was built in 1997 (that’s seventeen years ago as I write this article) and put in our printed catalog for 1999. Over this course of time, we have learned a lot on how to improve the design, and even evolved two more completely different 8-ball designs that accommodate different needs and desires of the 8-ball customer. I’ll cover the different frame designs and their features later in this post, but first let’s step into the wayback machine and study the history of this bike….or should I say bikes.

The history of this design:
As with most Rodriguez unique creations, there were several minds involved to come up with this design. We first started using S&S couplings to make travel bikes in 1996, and it dawned on me that we might be able to make a single/tandem convertible using these. I talked it over a bit with Matt, our head builder at the time, but we couldn’t resolve how to get the rear triangle connected effectively….and then what to do with the cables and getting them to be a seamless transition….etc… We put the idea to rest until John (our head mechanic in the mid 1990’s) showed me a drawing of a bike he wanted to have us build the he could use for travel, tandem, single, and bikepacking. There it was! He had drawn up a sketch of a frame that converted from single to tandem and solved the rear triangle issues. We built the bike, and solved the cable transitions as we built, and it all worked out perfectly. That year at Seattle Bike Expo (we used to do trade shows) John spent the weekend demonstrating this unique creation as he converted it to tandem, to single, and back again for the show goers.

Round 2:
About this same time, Author/Adventure cyclist Willie Weir was planning his trip to Cuba. Willie planned to take something extra along with him on this trip…..his new wife. They wanted to ride a tandem through Cuba. “No problem there” we said, “we can make a travel tandem for you to take on the plane.” “There is a problem though” Willie said, “It will just be by myself for the first leg of the trip, and Kat will join me later”. “What will I do with my single bike when she shows up with the tandem?” Little did he know, we had already solved his problem. I told him about the Rodriguez 8-ball that we had built for John, and he was intrigued. So, we sketched up a bike for them that he could ride as a single for the first leg of the trip, and then Kat could join him mid way and they could continue on through Cuba via tandem….8-ball style.

Willie tells the story of the salivating faces of the cab drivers in Cuba as an American woman shows up with a large box, and here’s Willie to pick her up at the airport on just a bicycle! The cab fair from Heaven, right? Wrong. You see, the box that Kat was carrying contained her luggage and the center section of their new Rodriguez 8-ball. Imagine the surprise on the cab driver’s faces as Willie takes his bike apart and adds the center section. After a few moments, they load the panniers on the freshly converted bike and ride away (waving to the cab drivers). Willie says that the drivers actually all applauded as they rode past. Read more of Willie’s adventures in one of his fascinating (and funny) books available at willieweir.com

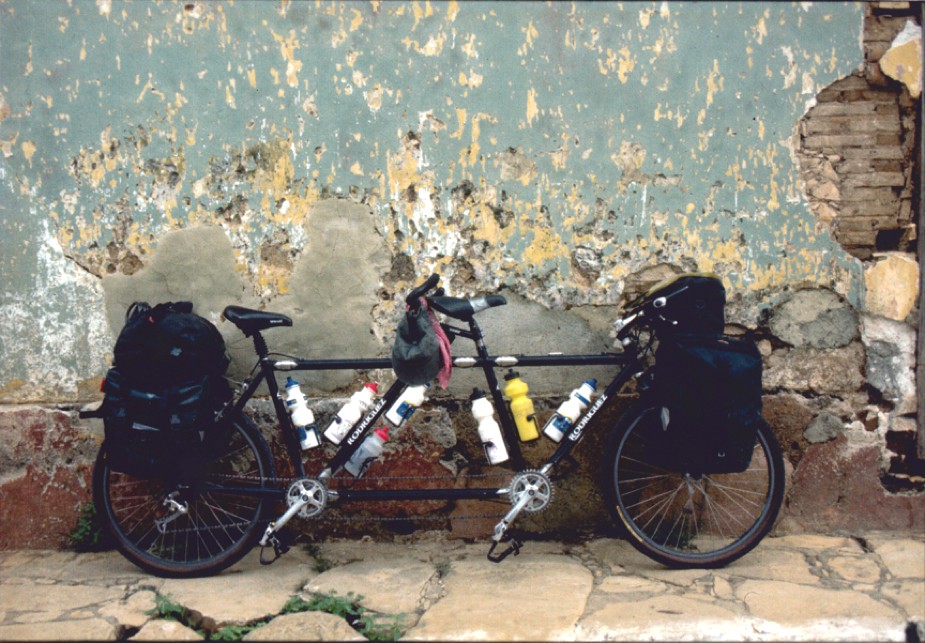
Willie and Kat’s 8-ball in Cuba (1998) looking much better than the building behind it.


More 8-ball fun:
After Willie’s bike, we built several more 8-ball convertibles. Each one different from the last. In 2003, we had one of our 8-ball customers call up and ask if we could build a third section for their 8-ball…making it a triple, double, single. “Why not?” I said, so off we went. It was fun, and a lot easier than we thought to make the 3rd section work well. Here’s a few shots of it.

After the conversion to triple went so well, we had a small flood of x-tra long bikes that were also convertibles. We did a couple of 3/2 convertibles, a 4/2 convertible, and my 4/3/2 convertible. We even did a 5/4/3/2 convertible.

Focus Please
But I digress. This article is about tandems that convert to singles. A subject that we know a lot about. As time went on, the Rodriguez 8-ball became a cult favorite. Each one dawned its own nickname….like Brian and Sue’s ‘Mama Cass’…or Charles and Rose Ann’s ‘Study in Orange’.. or the ‘Trickel Nickel’. I can’t leave out Mike and Angela’s ‘Big Blue’. I could go on and on about the fun customers that have Rodriguez 8-ball convertibles.

Even though the 8-ball was a success, there were customers who wanted one that couldn’t get one because of sizing restrictions. These restrictions brought about 2 new Rodriguez 8-ball designs

Why a new design was needed:
The one problem with the original design was the fact that the riders had to have similar saddle heights in order for the design to work properly. If not, then either the stoker had no stand-over clearance, or the captain’s seat couldn’t be raised high enough. The top tube had to be level. For a lot of people, this is fine, but for others, this didn’t work well.

In a traditional tandem design, we slope the top tube in order to give more stand-over clearance for the back rider, and get the seat tube long enough for the front rider. Over the years, I had drawn up a couple of frame designs that addressed this issue and had them ready for when someone needed that solution. It wasn’t until 2009 when we had our first taker on one of the new designs.

You can see a comparison of the 3 different Rodriguez 8-ball designs here.

In these two new designs, the rear triangle detaches and and re-attaches to the captains seat tube. This means that we can slope the top tube like a standard tandem, and the rider’s seat heights are completely un-important in the frame design any longer. There are ups and downs of each design, but suffice it to say that any of these designs are a challenge for any builder to execute well.

Here’s an example of design #2 that we built in 2009

Conclusion
I wrote this article to explain how this bike came to be, and show the evolution of the design. I think that it’s worth mentioning that this is a very challenging design, and each 8-ball is a completely unique creation. While we welcome other manufacturers to the party, we want to let the general public know that the convertible tandem/single is not a new creation, but has been alive and well for 17 years now at Rodriguez Bicycle Company.

The attention that’s being paid to it now is long overdue I say. Thanks John, Matt, David, Todd and Dennis for all your contributions as well as all the other team members here at Rodriguez who’ve put in the time and thought to make these incredible designs successful. We wish all of our 8-ball customers many years of happy cycling! And to those of you in the market today for such an animal….why not consider the most experienced team in the industry to build your Rodriguez 8-ball convertible?