Look Ma! No Derailleurs!

Look Ma! No Derailleurs!!
(As originally published in The Bicycle Paper in Summer of 2011
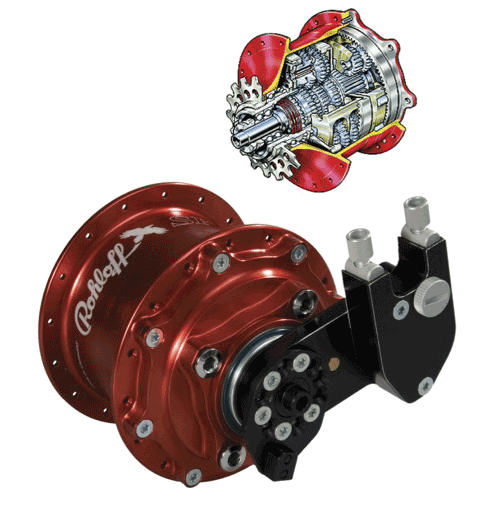
Rohloff Speedhub illustrationsOver the last 8 years or so, we’ve seen a lot of interest in internally geared rear hubs (IGH for short). A bike with an IGH has all of the gears housed inside the rear hub instead of using traditional cogs, derailleurs and chain rings. Remember your old 3-speed (or your parent’s old 3-speed)? It’s like that, but with a lot more gears. IGH technology is an old one (over 100 years old actually), but with the invention of derailleurs, the 3-sp IGH was abandoned by most cyclists for the unlimited gearing options of the derailleur. I don’t see the end of derailleurs anytime soon, but for those who are investigating IGH, we’re trying to help you with your homework.

When Todd Bertram, a master frame builder here at R+E Cycles in Seattle, returned from Germany in 2003 he brought with him something special. It was a finely crafted piece of German engineering known as the Rohloff Speedhub. He’d spent almost two years in Germany, worked in the Rohloff factory, and had seen a lot of these on bicycles throughout Europe. He had a sneaking suspicion that soon, this engineering marvel would capture the eye of American cyclists as well.

A Rohloff hub has 14 speeds instead of just 3. Now the IGH rider could have the same range of gearing that would be found on a traditional 27-speed touring bike. A bicycle equipped with a Rohloff Speedhub has no derailleurs to worry about, and is virtually trouble free as far as shifting goes.

Since 2003, news of the Rohloff Speedhub slowly made the trip around the world to the United States. What used to be a curiosity is now an accepted design. Because of its trouble-free reputation, it has become a popular item with touring cyclists, and ‘go-anywhere’ cyclists. Building Rohloff equipped bicycles has become an industry in and of itself. The special hub calls for some special frame design to make life easier for the rider though. Custom frame builders all over the U.S. are trying to design adaptations for their touring bikes to accommodate customers who are requesting this new hub.

As the builder of Rodriguez Bicycles, we got lots of questions from curious adventurers, but we didn’t start getting a lot of orders until 2009. Since then, sales have ballooned. We’ve seen our sales of Rohloff equipped bikes double each year over the last 3 years. As of November 2011, Rodriguez Bicycles has become the number one builder of Rohloff equipped bicycles in the United States as confirmed by Cyclemonkey, the exclusive U.S. Rohloff importer. (Probably the reason we were asked to write this article).

Who wants an IGH? While most of our Rodriguez Touring bikes are still equipped with derailleurs (just Shimano these days) higher end touring cyclists have been looking for alternatives to derailleur equipped bikes. This is because Campagnolo, SRAM and Shimano have all but abandoned the high-end touring market. Instead, the big 3 have focused their advertising and development on racing equipment that’s expensive, doesn’t hold up for touring, and limits the gearing ratios too much for touring. Shimano still has a some great derailleur options for the sub $2,500 bike market, but for the high end, a lot of folks are now considering the move away from derailleurs.

Another customer who has interest in IGH is the urban commuting customer. Commuters are very hard on their equipment, and some of them are very attracted to the idea of a bike specifically designed as a trouble-free commuter.

What are the IGH options? With the worldwide popularity of the Rohloff Speedhub on the rise, Shimano has taken notice of this new market as well. Shimano has been building some IGH hubs for several years, but their offerings have always been suitable for more of an urban commuter bike rather than a serious touring bike.
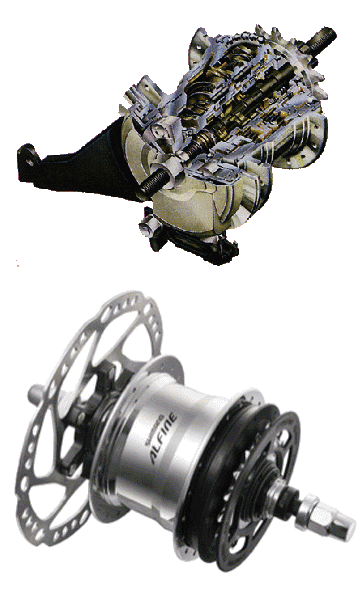
Shimano Alfine illustrationsLast year, Shimano introduced their first serious entry into the field of IGH touring hubs, the Alfine 11. Now that Shimano is making a run at the high-end IGH market, that has spawned a lot (and I do mean A LOT) of IGH questions from around the world. People (as well as us) were hoping that the new Shimano hub would give them Rohloff performance at Shimano prices. As a major Rohloff builder, a lot of those questions have come to us.

When the The Bicycle Paper asked me to write an article comparing IGH hub options, Jeremy and I were actually in the middle of answering those very questions in the form of an FAQ series on our website. So, as it happens, we have the answers:

In addition to Rohloff equipped bikes, we have now built and sold several bikes with Shimano IGH hubs on them as well. Our experience with the different hubs shows us the best use for each.

We’ll compare 3 different hubs (the 3 we’ve built with): The Shimano Alfine 8-speed, the Shimano Alfine 11-sp, and the Rohloff Speedhub 14-sp. Shimano does make some lower end 8-sp IGH hubs (Nexus), but this article is ‘geared’ toward the more serious cyclist.

You’ll need to be familiar with a few terms:

Gear Range: This is the % of gearing change from the lowest to the highest gear. A good range % between high and low is important for touring. ie. the higher the better. Unlike a derailleur system, for the IGH the gear range is forever. A standard modern day touring bike will come with a gearing range of about 450%. It can easily be adjusted to about 600%, but the 450% gives us a good starting point. By comparison, an old 10-speed bike from the 1970’s would come with a range of 250% or so.

Gear Ladder: Another thing to consider is what we call the Gear Ladder. The Gear Ladder is the % of distance between each individual gear change. On a derailleur system this is adjustable by using different cogs or chain rings, but for an IGH, you bought it, you got it.


First up – The Shimano Alfine 8-sp:
We’ve built several urban commuter bikes with this hub, and even a few sport/fun tandems.

  • This hub is limited to 308% gear range. More than the old 10-sp, but not really enough range for serious touring.
  • The Gear Ladder is very uneven. Ranging from 1st gear, it looks like this: 23%, 16%, 14%, 17%, 23%, 16%, 14%.
  • Wheel attachment is bolt-on only, so no quick release rear wheel.

Shimano Alfine 11-sp:
The gear range is 409%. It doesn’t quite get you to the range of a stock touring bike, and nowhere near the range of the Rohloff.

  • Although Shimano originally planned an evenly spaced Gear Ladder, the final result was disappointing to many rabid IGH fans.
  • The spread between first and second gear is a whopping 30% jump. The ladder runs even 17% and 18% for the rest of the gears, but that first 30% jump is really big.
  • The absence of a quick release makes this hub less desirable for many serious touring cyclists as well.
  • Also, for you belt drive fans, use of a belt drive on either Alfine hub will limit your tire width as well.

Rohloff Speedhub:
The King of the IGH! For the truly serious touring cyclist, the choice is the Rohloff Speedhub. We’ve built touring bikes, mountain bikes, and serious tandems equipped with Rohloff Speedhubs.

  • The Gear Ladder is a uniform 13.6% all the way through the range.
  • The Speedhub can also be ordered with a quick release axle or a bolt-on axle.
  • The design allows for better belt drive/wide tire compatibility.

All in all, the Rohloff is better suited for the customer who wants an IGH, and wants a real replacement for their touring derailleur setup.


Summary: The Alfine 11 is not really the alternative that we or the IGH touring cyclists were hoping for. While it’s a great hub for an urban commuter, our touring customers want more than it has to offer in many ways. Rather, the Alfine 11 is an alternative to the Alfine 8 for the commuter that wants a bit wider gearing range.

The serious touring cyclist will still have to choose between derailleurs or the Rohloff Speedhub.

Since a high quality custom touring bike will run you about $2,000 in our shop, a serious IGH touring bike turns out to be quite a bit more expensive. Even so, many folks are choosing to go that route in order to have the convenience and low maintenance of the Rohloff. We run about 70% derailleurs, and 30% Rohloff for the touring bikes at this point.

If you’re considering a Rohloff or other IGH equipped bicycle, the FAQ section of our website has a dozen or so articles comparing, contrasting, and listing all of the pros and cons of each design.

Disco Fever

In our industry, products from the past seem to re-appear quite often. Bicycle disc brakes are one such item. Like a Phoenix, theyโ€™ve risen from the ashes a 3rd time in just the last 40 years. Since their acceptance as

Article Overview
In our industry, products from the past seem to re-appear quite often. Bicycle disc brakes are one such item. Like a Phoenix, they’ve risen from the ashes a 3rd time in just the last 40 years. Since their acceptance as a superior brake for the mountain bike, it seems that more and more people are asking about them for their road bikes. Most manufacturers are happy to just slap them on, but is there more to consider? Are they better for every type of bike and every type of riding? Let’s follow the history a bit, and see.

This article is for those who want to learn more about bicycle disc brakes. It’s not to convince the reader that disc brakes are good or bad. My purpose is to let you all know that disc brakes have been around a long time in our industry, and there are upsides and downsides to them. We’ve built hundreds of frames over the last 40 years that are designed for disc brakes (over 100 in 2012 alone). We also run one of the largest bicycle facilities in Seattle (since 1973) and we service disc brakes of all types on a daily basis. We have more history and experience than most to draw from. So, if you’re ready to separate the fact from the fiction, put on your dancin’ shoes and boogie, this is the article for you.


Disco Fever
November, 2012

It was the 1970’s! The BeeGees were ‘Jive Talkin’ all over the music charts, and all the kids wanted to be Vinnie Barbarino (Welcome Back Kotter). I was the resident bicycle kid in my Junior High class, and I rode my Raleigh Rampar all over the area all of the time. So, imagine my surprise when my buddy Barrett showed up at school on a new ride…..one with all the candy! He was excited to show me his new bike, but class was about to start and we didn’t have time to go back outside and look at it. I got a quick verbal description (including hand motions) painting a vivid picture of this futuristic 10-speed. “It has numbers on the gear shifters to tell you which gear it’s in….like a car!” he said as he motioned the international ‘stick shift’ hand signal that all boys of my generation understood. “But, that’s not all! My bike has disc brakes like a car!” Could it be? I thought. Disc brakes on a bicycle? Wow! How cool is that?

What Barrett had purchased was a Western Flyer 10-speed at the local auto parts store (Western Auto) in our small town. After school, we looked at his bike together, and he did indeed have a bike with all of those features.

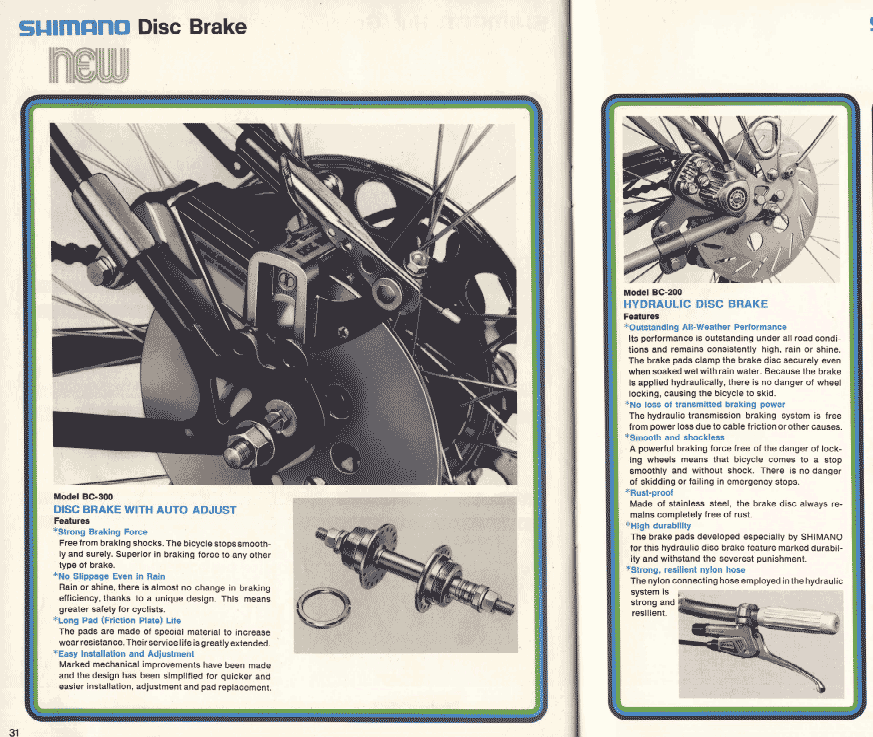
As it turned out, in 1975, Shimano actually had just released 2 versions of disc brakes for bicycles. One hydraulic, and one cable-actuated. Here’s the page from the 1975 Shimano catalog showing both types of Shimano bicycle disc brakes.


Note:

I know a lot of people, even people in the bicycle industry, think that bicycle disc brakes weren’t even invented until the 1990’s. There are probably older versions of bicycle disc brakes, but from my historical perspective, life began in the 1970’s shortly after the invention of the wheel, so that’s as far back as I’m going to reach in this article.

Back to the story
Now, finding out that he had a Western Flyer eased my jealousy quite a bit (Western Flyers were just Huffies by another name). I proudly rode a Raleigh from a bike shop in a neighboring town (our small town had no bicycle shops).

As the 1970’s disco’ed on, so did the introduction of more and more bicycle disc brakes. Bridgestone, Japan’s largest bicycle company, introduced their new cable actuated disc brake, and Phil Wood came up with a super high-tech disc brake that we here at Rodriguez used on tandem bicycles.

Just a quick note: Some people think that we at Rodriguez bicycles are anti-disc brake. As you can see, we’ve used disc brakes on our bikes since the 1970’s. Most of our customers choose cantilever brakes for touring and tandem bikes because they like them better, not because we don’t offer them with disc brakes.

Good Money Gone Bad!
All that money spent on R&D, but the bicycle disc brake would die in the early 1980’s along with disco. Now, everyone knows that disco burned itself out, but why didn’t the disc brake stick as a bicycle component through the 1980’s?

A lot of people will say “Well, those old disc brakes didn’t work well” but those people would be wrong. They may not work well by comparison to disc brakes of today, but comparing them to rim brakes at that time, they worked great! The industry was behind them, and they spent tons of R&D cash to develop, manufacture and promote them. So, why didn’t they catch on? Eventually, the disc brake was sent to the scrap heap of ideas gone bad.

The ‘Road’ to Failure
In the 1970’s, every bike was a road bike. The fact was, even though disc brakes worked well, they were a lot heavier, and a bit noisy. Add to that the fact that they were harder to adjust, and parts (like pads) were hard to find at your local bike shop. For road bikes, rim brakes worked fine and they were lighter as well as less expensive, and any bike shop or sporting goods shop had pads in stock for them. In short, the benefits of the disc brake were outweighed by sacrifices….at least as far as road bikes and tandems of the 1970’s were concerned. The need for a disc brake really didn’t exist until the introduction of the mountain bike a decade later. Besides, we all needed to save our money for some new dancin’ threads.

The Metal Years
Fast forward to the late 1980’s. Disco is dead, Poison, Motley Crue, and other bad boys (that looked like girls) topped the charts, and a few high-end mountain bike companies are looking for brakes that will work even if the rims are bent and covered in mud! I know! How about disc brakes? Yes, the disc brake is resurrected in the late 1980’s by a few high-end mountain bike companies.

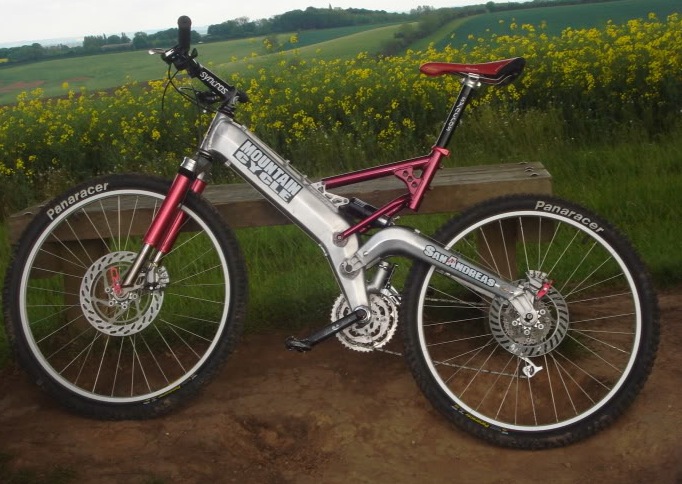
Now, one would expect to see the Bridgestone, Shimano and Phil Wood discs simply re-appear…..right? Well that’s not how we do things in the bike industry. Even though these would’ve been great starting points, we started again, re-inventing the same designs that used to exist. Here’s an example of a 1980’s mountain bike with a set of Suspenders hydraulic/cable disc brakes. There were a few different high-end disc brakes in the late 80’s. Most of them were expensive and difficult to adjust. Some of them worked alright, but some didn’t really cut the mustard. Shimano put out the V-brake (yuck!) somewhere in the early 1990’s, and that really became the brake of choice for most mainstream mountain bike customers. Only the really high-end specialty mountain bike ran disc brakes…


A quick deviation into the 1990’s tandem world
As is custom in the bicycle industry, tandem builders tend to think that something made for a mountain bike will work great on a tandem. Don’t ask me why, but for some reason there are people that see a correlation between a 180 pound guy trying to stop while riding through a muddy stream at 20mph, and a 350 pound tandem team trying to stop while screaming down a mountain pass at over 60mph on asphalt. I fail to see the similarities, but none-the-less, as high-end mountain bikes started using disc brakes in the 1990’s, tandem people requested them on a regular basis. Here at Rodriguez, we used a lot of the Hope disc brakes in the 1990’s on tandems. We only used them as an auxiliary brake, and never as a primary brake. As a matter of fact, I still have 2 of these brakes sitting here beside my desk as I type this. I can tell you many stories of mythical tandem disc brakes (sometimes resulting in very aggravated customers), but suffice it to say that this brake was not at all capable of stopping a tandem, just slowing it down.

The point of this deviation is: Mountain bikes use disc brakes not because they work better, but because they work better on mountain bikes.


..So, as a high-end mountain bike brake, the disc brake limped along through the 1990’s, but never took off as a standard to be used as primary brakes on tandems or touring bikes. Really, that’s not what they were designed for, so that makes sense right?

Home Sweet Home
The disc brake finds its home in the new millennium
Benefits Galore! To the mountain biker, the disc brake is a gift from above. Now the off-road rider could bash his/her rims completely out of true and their brakes don’t rub. They can ride through a muddy stream and their brakes don’t clog up. They don’t have to worry about sand and grime all over their rims getting trapped in their brake pads and damaging their rims. The mountain biker is willing to trade the noise and extra weight for these benefits. Noise doesn’t matter much because off road riding is pretty noisy anyway.

As companies embraced the disc brake, lower cost versions of cable actuated disc brakes developed and the V-brake could finally all but disappear from the industry. Not soon enough I say…the V-brake was the worst of both worlds really, but that’s a whole different article.

Now we see almost all mountain bikes with disc brakes (as we should) and we see the tandem and road bike companies offering them as well. We offer disc brakes on any bike we make. The question often asked of us is “why not use disc brakes on all bikes?” Believe me, it would be easier for us to just use disc brakes on all bikes and tell people the same thing that are reading in the magazines…..ie. that disc brakes solve all your problems and are the perfect solution for every type of riding. We do have an obligation to the truth though, and the truth is that there are certain applications where a disc brake is preferable, and certain applications where they are not the best choice.

The theory goes “If they work better on a mountain bike, won’t they work better on a road bike or tandem as well?” Gee…where have I heard that logic before?

One size does NOT fit all
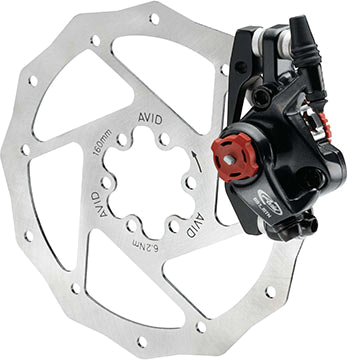
In reality, there are applications that are better suited for disc brakes and there are applications that call for traditional brakes. When you think about it, all bicycle brakes are disc brakes. A disc brake uses a disc brake caliper attached to the frame to grasp a spinning disc (rotor) attached to the hub. A traditional brake is a caliper that uses the rim (also a spinning disc attached to the hub) in place of the rotor. This eliminates the need for the second spinning disc (rotor). I’ve got an anecdote about this theory if you want to take a break from this article. There are benefits and drawbacks to disc or traditional depending on your riding conditions and desires.


It’s Important to Be Careful
Improper assumptions by you, a bicycle manufacturer, or a bike shop can result in serious injury or even death. Want some proof? Here it is.

What should I do?
We’ve come full circle with the disc design, and they look a lot like those 1975 Shimano brakes don’t they? There are very good cable actuated and hydraulic disc brakes. Even so, the benefits and drawbacks remain the same as they did in the 1970’s. Nothing’s changed in terms of road bike uses. The mountain bike brought on a whole new style of riding and with it, many innovations that wouldn’t have come around otherwise. The disc brake is proof of that. The mountain bike brought the disc brake back from the dead, and it’s the perfect application for it.


Controversy where there should be none
I had some reservations about even writing this article, and I’ve put it off for a couple of years. I’ve actually had some people get mad at the fact that we see any downside at all to the road bike disc brake. It seems that over the last few years, magazines and blogs have been buzzing with glowing reviews about road bike disc brakes and one who dares to suggest that there is anything but perfection in the design is labeled a ‘retro-grouch’ and shunned. Well, maybe shunned is too strong of a word, but there have been occasions when I’ve had discussions with folks who seem to get angry at the fact that most of our road bike customers prefer a rim brake.
Here’s a quick story
about one such occasion.

As it turns out, paper doesn’t refuse ink, keyboards don’t refuse fingers, and the internet doesn’t refuse opinions of those who have vested interets. Its up to those who have decades of experience building and servicing bicycles to bring the facts to the surface (facts are stubborn things).


I decided to go ahead and write the article though, and I hope I’ve done so in such a way as to not offend the true believers. Being the kind of shop we are, we won’t try to push you into one style of brake or another. Instead, we’ll just put together a list of the benefits and compromises attached to each type of brake and you can decide yourself which brake suits your style of riding and budget. Without further ado, ladies and gentlemen: Behold…The List!

The Upside of disc brakes:
Avid BB7 Disc Brake

  • Work the same if your rim is straight or if it’s bent
  • Shops with very young mechanics know how to work on disc brakes (not so much with rim brakes)
  • Work better if you’re riding through a stream
  • People will say “Cool! Disc brakes!”

The Downside of disc brakes:

  • Disc brakes can be noisy. Not a problem off road, but on a quiet road ride the constant scraping sound drives me nuts.
  • The bike equipped with disc brakes will weigh 1 ~ 2.25 pounds more than rim brake version of the same bike
  • Hard to find brake pads or rotors if you’re touring in remote areas (make sure to carry spare pads and rotors)
  • Hard to tell what brake pad wear is
  • Can suffer from ‘hard to diagnose’ inconsistent performance
  • If your bike is a travel-bike, the disc brakes make packing and un-packing much more difficult

The Upside of rim brakes:

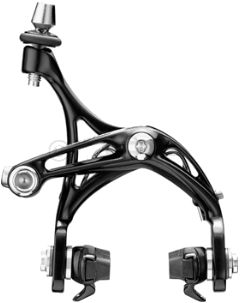
Campagnolo Chorus caliper brake

  • Quiet
  • Lighter weight frame, fork and wheels can be used (save up to 2.25 pounds)
  • Lower cost. ($200 ~ $500 less)
  • Longer pad wear and lots of pad options available
  • Replacement pads are cheap, available everywhere, and last longer than disc pads
  • Pads are relatively easy to replace

The Downside of rim brakes

  • Younger, inexperienced mechanics may get ‘creative’ while adjusting your brakes.
  • Rub the wheel if you break a spoke or bend your rim
  • Poorly maintained, can wear out your rim prematurely
  • Don’t work if you’re riding through a stream
  • People will say “Why didn’t you get disc brakes?”


Thanks for reading,
– Dan

Why not 26 Inch Wheels instead of 650c?

Since our series on 700c vs. 650c ran, I’ve gotten a lot of e-mail questions about 26″ (mountain bike sized or 559 size) wheels.

The question that people have is “why don’t you use mountain bike sized wheels instead of 650c? Wouldn’t that give the customer more rim and tire choices?”

Related Items
Find wider 650c tires at
650biketires.com


See photo galleries of 650c bikes at www.rodbikes.com


See photo galleries of 26″ bikes at www.rodbikes.com

The funny thing is, we love 26″ wheels as well. 26″ wheels offer all of the same design advantages for the petite cyclist as the 650c. Actually, we build a lot more bikes with 26″ wheels than we do with 650c. I’ll bet we build more 26″ wheeled road bikes than just about any other custom builder around. One quick look at our website, and you’ll see that we have several models that use 26″ wheels for every frame size, and all of our touring bikes come standard with 26″ wheels for all of the smaller sizes. Our popular UTB has run 26″ wheels since 1996, and the Rodriguez Adventure touring bikes have run 26″ wheels for the small sizes since the creation of the model as well. We were a pioneer in 26″ wheeled tandems and touring bikes throughout the 1980’s and 1990’s, and still offer 26″ wheels on any tandem or touring bike we make. As a matter of fact, more than half of Rodriguez tandem riders (including myself) choose 26″ wheels. Just look at our main photo on our custom tandem page or the Toucan ST tandem page. Almost all of our new Rodriguez Make-shift customers order their bike with 26″ wheels as well. I can’t leave out our exclusive Rodriguez 8-ball convertible tandem/single travel bike either. Since it’s inception in 1995, all but 2 of these have been built for 26″ wheels (one went with 700c, and one went with 24″ wheels). Here’s a gallery with just a few of the 650c bikes that we’ve built last year alone.

As you can see, 26″ wheels have a very long history on Rodriguez bicycles

This series of articles was focused on road racing bikes, and there is a disadvantage to a 26″ wheel on a road racing bike. That disadvantage is tire and rim availability. Although there are plenty of rims and tires available for 26″, the selection that a racer would want to use is extremely limited. 650c offers a decent selection of lightweight racing tires from 23mm to 28mm by companies like Michelin, Vredstein, Serfas, Continental, Hutchinson, etc… 26″ offers the rider great variety in wider touring tires, but almost no 23mm options, and very few light weight rim options.

Road Race bikes are a different animal than tandems or touring bikes
For a couple of years, we ran 26″ wheels on the smaller our best selling Rodriguez Rainier road model, but we found that rim and tire choices were too limited for some of our ‘go-fast’ road bike customers needs.

A Rodriguez Rainier built to accomodate 650c or 26 inch wheels

This bike is shown with 26″ X 1.25″ wheels, but the owner, Nancy, has a pair of 650c racing wheels that she runs for “race day”

In a perfect world, the industry would begin manufacturing 26″ tires and rims in racing weights, or 650c rims and tires in touring weights. But for now, the petite racer has a much better selection on 650c, and the touring cyclist has a plethora of excellent choices in 26″.

Why not a bike for both 26″ and 650c?

What’s really cool is a bike that will use both 650c and 26″. We’ve built several of these through the years, but requires some special considerations when it comes to brakes. Standard brakes will not work for both wheel diameters, but if the rider is willing to adjust their brakes, they can have a bike like Nancy’s (above), that can use both wheel sizes.

In summary, nobody would like to see the acceptance of one standard wheel size than I, but suffice it to say we will continue to offer the petite cyclist choices that suit their style of riding in any wheel size.

To see more 26″ and 650c wheel bikes, visit our website and look through the image galleries for the different models. Every image gallery has bikes with various wheel sizes. To get you started, here is a gallery of just some of the 650c bikes that we’ve built last year alone.

Related Items

What’s the effect of wheel size on speed?

This is part 8 of 8. Here is the start!

When someone in the industry (people in the industry should know better) tells a smaller rider “small wheels are slower”, what I hear them saying is “riding with knee pain, discomfort in your shoulders, neck, back and numbness in your hands on a bicycle that’s harder to control can make you ride faster.” This doesn’t sound like good advice to me. Especially when there’s so much proof that their “smaller=slower” claim is completely false.

Related Items
Find wider 650c tires at 650biketires.com


See photo galleries of 650c bikes at www.rodbikes.com

The truth is, when someone tells you “smaller wheels are slower”, what they are saying is “I have nothing with proportional wheels to offer you”. At Rodriguez, we’ll offer you either size, and give you the facts about both.

There’s really two myths that people are told about why 650c wheels are slower than 700c. We can easily put the facts together to show that both of these theories, while having some truth in them, ignore several other aspects of the differences. Those differences easily offset the reasoning that is used by so many in bike shops around the country to try and scare petite riders into bigger wheels.

Warning: Severe Facts Ahead

Slow myth 1.) Salesperson says “Smaller wheels have to make more rotations to travel the same distance.”

This part is true. A 650c wheel has to turn 823 rotations to travel 1 mile, while a 700c wheel has to rotate 763 times for the same distance. Salesperson says “More rotations = more friction in the bearings and that causes you to go slower.” …..not exactly. All other things being equal, this would be true, but there’s more to the equation.

What the salesperson doesn’t know, or has neglected to inform you of is that the 650c wheels are 8% lighter than the exact same wheels built in 700c. Think about it. A smaller rim, shorter spokes, smaller tire, tube and rim strip all add up to big weight savings for the 650c. Just for fun, ask that same salesperson if heavier wheels are faster than lighter wheels? We all know of course, that lighter wheels are the best way to speed up any bicycle. You could also ask him what wheel size is used on bicycles that hold land speed records? That’s because of those darn facts again. This time it’s rotational mass….read on and see what I’m talking about.

Friction, Bricks, and Rotational Mass
When an object (like a bicycle wheel) is spinning, it is subject to the laws of rotational weight. Rotational weight is the ‘evil’ that everyone with any size of wheel is trying to get rid of. This is because of rotational mass. Imagine a brick tied to the end of a string. Pretty easy to hold up right? Now swing the brick around in a circle. It feels much heavier. If the brick is lighter and the string is shorter, then it’s easier to spin. Rotational weight of a wheel is magnified in this same way. As a wheel starts to spin, all of the weight out at the end of the spokes is ‘the brick’. Less rim, spoke, tire, tube, etc. equates to a ‘lighter brick’ to spin, and a smaller diameter equates to a shorter string. A lighter wheel is much easier to spin up to speed than a heavier one.

Need more scientific evidence than a ‘brick on a string’? Here’s a scientific article detailing the effect of weight and size on the rotational mass of a spinning object.

“C’mon Dan! That article was way techo-geek speak!” “How about some easy proof that everyone can understand?”
How about a spinning ice skater? Here’s a quick article of how an ice skater speeds up their spin. By pulling their arms closer to their body, they pick-up speed right?

In short
The 8% weight savings for the 650c wheel sizes easily negates the added friction for the additional rotations that it makes.

Slow myth 2.) Salesperson pulls out a gear chart and illustrates to the customer “Smaller wheels mean that you have to turn the cranks more revolutions to travel the same distance.”

Rant Warning
I’m sorry, but I have to pause here to say, if a salesperson ever says that to you, find a way to politely leave the store. You’re either dealing with someone who’s trying to mislead you, or they really don’t know what they’re talking about. Either way, I recommend finding another shop. I’ve had people come to my shop who’ve been told this very thing by dealers who know better.

OK, rant time is over and now it’s time to educate you on why gearing shouldn’t even be an issue in this topic.

Gearing
We’ve already established that one rotation of a smaller wheel is a shorter distance that one rotation on a larger wheels right? So wouldn’t one rotation of your cranks results in less forward motion too? Actually, it has all to do with gearing ratio, and nothing to do with wheel size. Now, if you put exactly the same size gears on the 2 different bikes, then the statement would technically be true, but that would be stupid. The gear ratio is selected for your style of riding and your strength. It’s the same on a car. A Porsche with small wheels is geared higher than a dump truck. The Porsche with smaller wheels is faster than the large wheel dump truck because the Porsche is geared for higher speed. Does that make sense? We use higher gearing to accommodate for smaller wheels, and lower gearing to accommodate for larger wheels. We can make any wheel size any gearing.

In the bike industry, gear inches are calculated the following way:
(Front chain ring size) ÷ (cog size) x (wheel diameter). For 700c x 25mm tires, use 26.77 for the wheel size. For 650c x 25mm tires, use 24.8 for the wheel size.

As you can see in the sample below, a simple change of one tooth size on the cog or chain ring is all that is required to gear the bikes almost identically. Actually, in the sample below, the 650c wheel bike is geared higher than the 700c. Any shop worth dealing with is going to work with you to determine the right gear ratio for your riding style and strength at no charge anyway.

Here’s a quick sample of a common road bike gearing for three different wheel sizes


Wheel size Front Chain rings Rear Cogs Highest Gear Lowest Gear
700c wheel 52/39 12-24 116 inches 43 inches
650c wheel 52/40 11-23 117 inches 43 inches
24″ wheel 55/42 11-21 113 inches 44 inches

You can easily see now that it’s misleading to assume that all bikes have to use the same gear sizes when showing someone a gear chart. Gearing is a non-issue when it comes to speed and wheel size.

Slow myth 3.) All serious riders ride 700c. Nobody fast rides small wheels.

“OK, these are all great facts, but are there any world class athletes that ride smaller wheels to victory?” You ask?

Well, I’m glad you asked. You could listen to what Stacia has to say. She set the cycling speed record for the Seattle Danskin Triathlon.

You could take

Lee’s word
for it (if you can catch up with her).

Maybe you’d like to talk to Anna after she won first place in her first Olympic distance triathlon.

No you haven’t hear of these people, but if you’re a petite cyclist, chances are you’ve seen them kicking the shorts off of folks out there in the ‘regular people’ world of cycling that we all live in. We’ve got thousands of customers out there like Nancy B. who thought 650c wheels would be slow, but have discovered how fast they are.

Again, I’m not trying to say that smaller or bigger wheels are faster or slower, and I don’t care what wheel size that you want to ride. I ride 700c wheels on my road bikes, and 26″ wheels on my tandems. I think that it’s important though that you understand that choosing smaller wheels to make your bike fit will not make you slower.


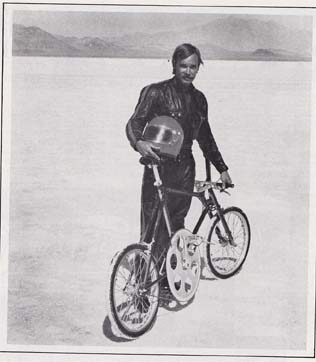
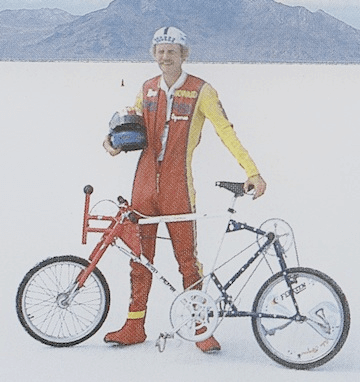
Are smaller wheels just for the ladies? How about something for the guys? Are there any tall guys who choose to ride smaller wheels professionally? Yes! Some of the worlds fastest bicycles were piloted by men and have really small wheels.

Obviously if bigger wheels were faster, one would expect to find bigger wheels, not smaller wheels, on record setting bicycles that are ridden at speeds of over 150mph. Yet, these guys chose really small wheels. Maybe they didn’t talk to the guy at the shop.

Don’t believe me? Ask these guys and (gal).

World Record holding Bike with small diameter wheels

Al Abbott sets the world record riding past 138 mph in 1973

Another World Record Speed Holder with tiny wheels on his bike

John Howard sets the world record at 152.2 mph in 1985

Laurent Jalaber climbing on a 650c wheeled bike during the Tour de France

Famous sprinter Laurent Jalaber becomes a climbing champion on a 650c bike in the 2001 Tour de France

Women's bicycle Land Speed Record - Denise Mueller
Denise Mueller sets the women’s world record at 147mph in 2016
Fred Rompelberg holds the current bicycle speed record at 167mph set in 1995
Fred Rompelberg’s record setting ride of 167mph in 1995 was achieved with really small wheels

Examples like these are easy to find, and number in the thousands. Again, I’m not saying smaller wheels are faster, but just that wheel size isn’t determinant of speed.

Still have some questions? email me, I’ve got plenty of testimonials and other articles on the subject. I’ve got no incentive to push either wheel size, and I own bicycles with both wheel sizes. I just hate to see people receive bad information and get a bike that doesn’t control well and isn’t comfortable.


The Real Cause of “Slow”
One thing that everyone can agree on is that discomfort, pain, and low confidence for controlling a bicycle will always result in slower riding. This isn’t even up for debate. Feeling comfortable and in control is the best way to speed up your ride. When the industry (or bike shop) is telling smaller riders “bigger wheels are faster”, I think what they mean to say is “make my job easier by compromising the comfort, fit, and confidence that taller riders experience.”

The real truth is that Comfort and Confidence = Better Performance and Faster Speed.

Related Items

Wheel size Cliff Notes

This is part 7 of 8. Here is the start!

A quick summary of the compromises that have to be made when designing bicycles for people under five feet, five inches tall.

Compromise 1, Accept Toe Strike
Some manufacturers choose to compromise safety instead of handling. By designing a bike for proper trail numbers, and a short top tube, this manufacturer has designed a bicycle that is very dangerous when trying to avoid an obstacle (like a car door or pedestrian) when riding. At Rodriguez Bicycles, we no longer build with this much toe strike because we have had to buy back so many small bikes over the years for this reason. No matter what someone tells you, you’re not going to get used to it, and too much toe strike is not OK.

This drawing is an exact re-creation of an actual bike that came in for repairs because the customer crashed while trying to avoid a car door. The rider was confused as to why they went down, but was sure they didn’t hit the car door.

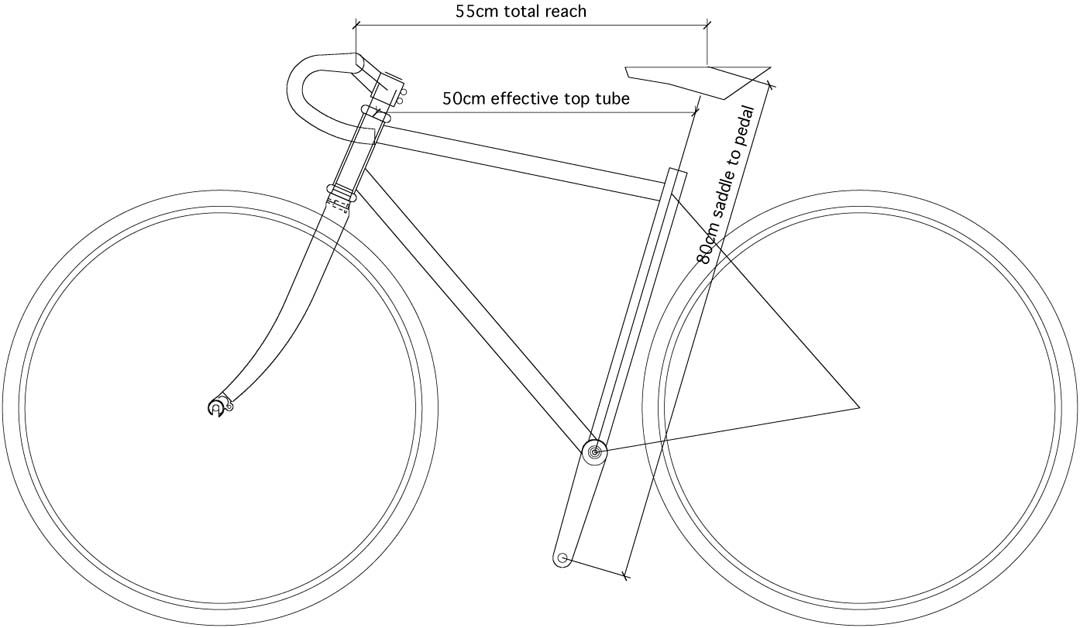
The picture on top shows that the bike looks perfectly fine, and normal to the untrained eye. The fit measurements line up just right for most women around 5’3″ tall. The same drawing on the bottom shows the issue of toe-strike.

Frame drawing with toe overlap

Frame drawing with toe overlap highlighted


Compromise 2, The Magic Top Tube
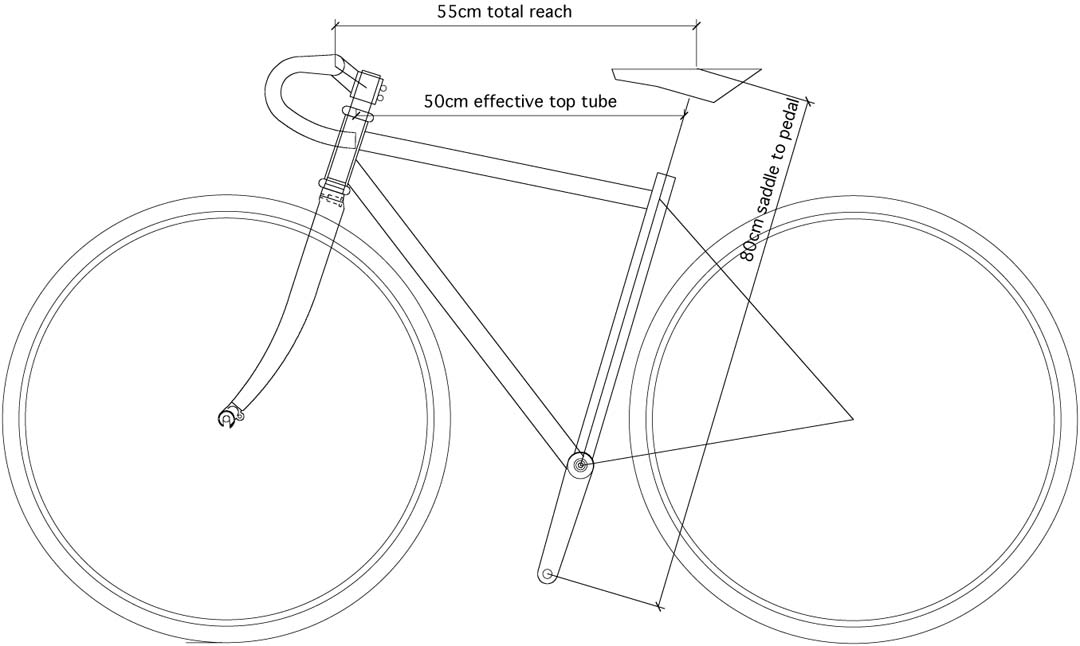
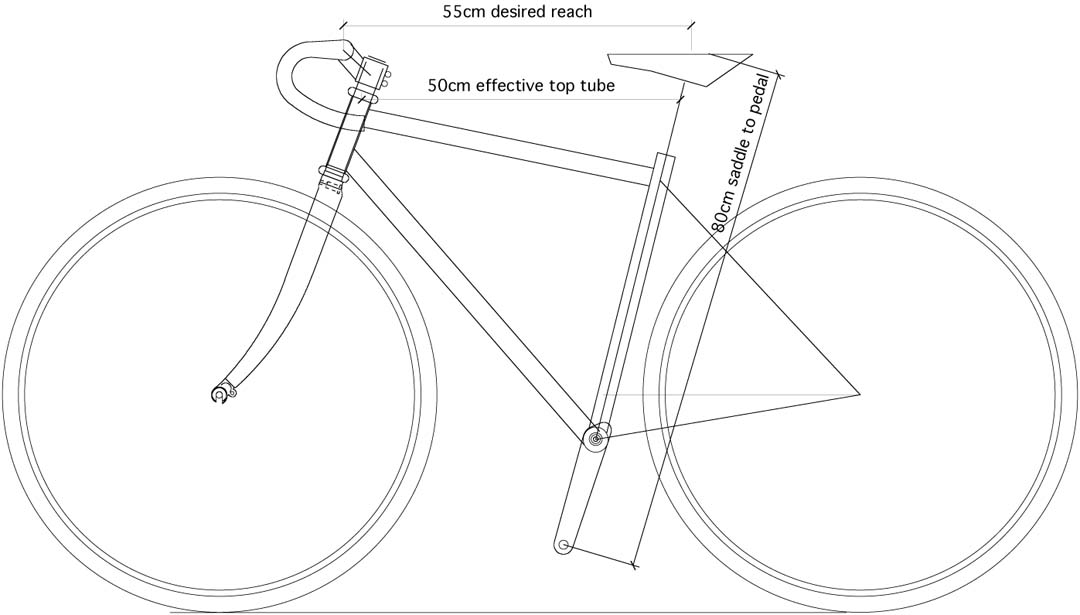
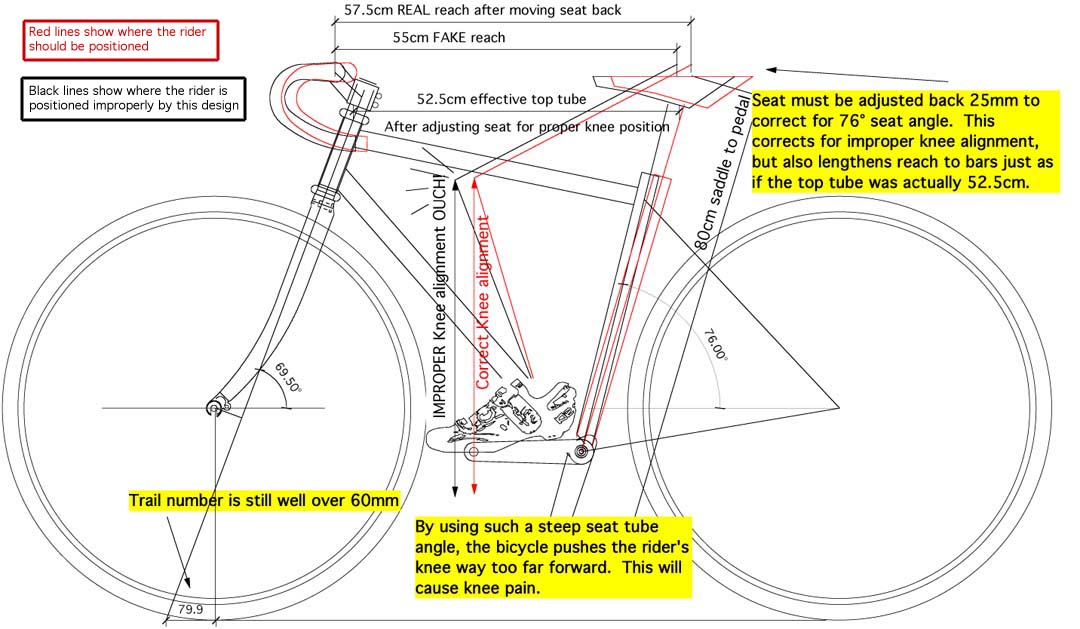
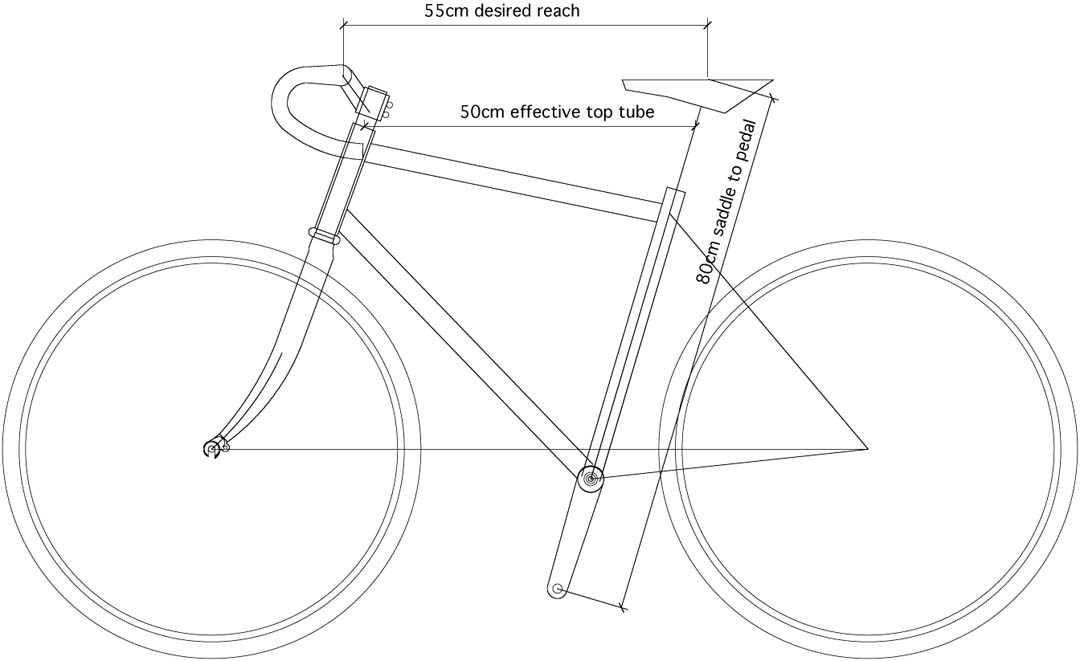
On the face of things, this second bike has no toe overlap, acceptable handling geometry, and the right fit numbers. What the untrained eye doesn’t see here is that this is actually a trick. The seat tube angle has been designed very steep, so the top tube is artificially shortened. This way the manufacturer can list the bike in a catalog with a short top tube.

In real life, this is the worst compromise for most riders because it makes the reach almost impossible to shorten. Riders that have bikes like this soon find out that their knee is way too far forward and they have developed knee pain when they ride long distances. The only way to correct it is to push the seat way back, effectively lengthening the reach to the bars too far for a shorter rider. Now the rider needs a stem that’s shorter than any thing available. Unless your fit numbers call for a really steep seat angle, I recommend against this option.

On the top, you can see that this bike looks normal. On the bottom, you see that this is actually the worst way to design a small bike with 700c wheels if you consider fit and control as important. Many, many companies use this slight of hand to pass off a small bike as ‘women’s specific’ design.

frame drawing with sneaky geometry

frame drawing with sneaky geometry highlighted in red


Compromise 3, Ignore Control All Together

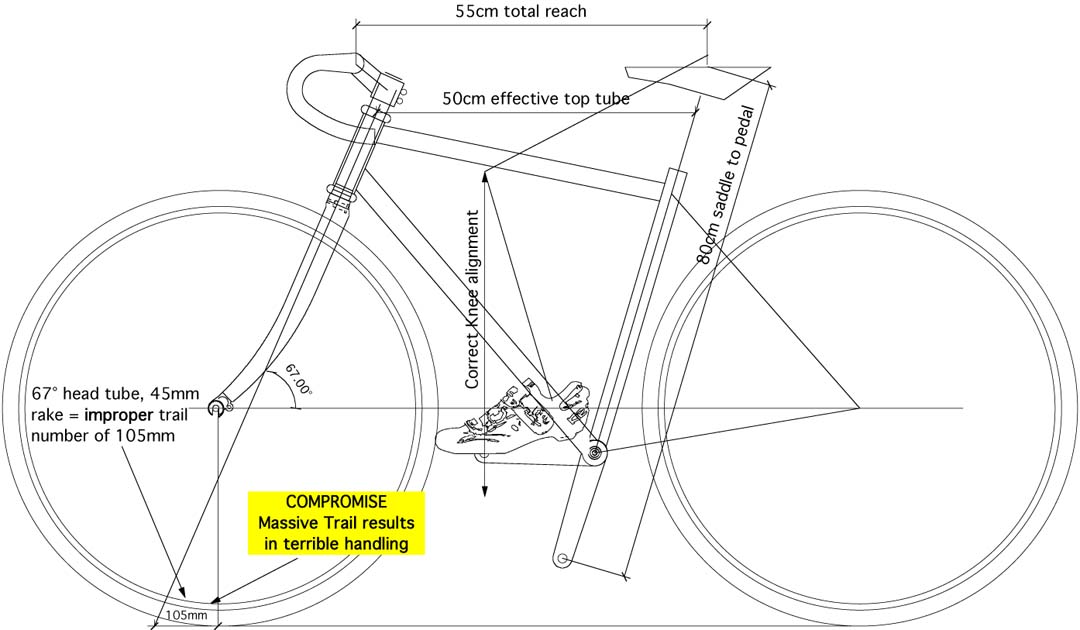
One way to get the big wheel out of the way of the rider’s foot is to slacken the head tube angle…..a lot…like a chopper. This option says “let’s build the bike to fit right, and we don’t care how it handles”. The bike drawn below is an exact re-creation of an expensive titanium custom bike that a 5′ 2″ tall woman brought in because it didn’t handle well. When I rode the bike, I would liken the handling to my grandfather’s 1966 Ford pickup without power steering. ie….it was a chore to steer this bike.

Although this option allows for a carbon fork, I suggest strongly that you try it for a weekend before you invest in a bike built like this. I also suggest that you try compromise 4 and 5 as well. I think that you’ll find that handling characteristics are much more important that you may think.

On the top, you can see that this bike looks normal to the untrained eye. On the bottom, you can see the result of a ‘chopper-style’ front end.

chopper bike frame drawing

chopper frame drawing with huge trail number pointed out


Compromise 4, Go Old-Style
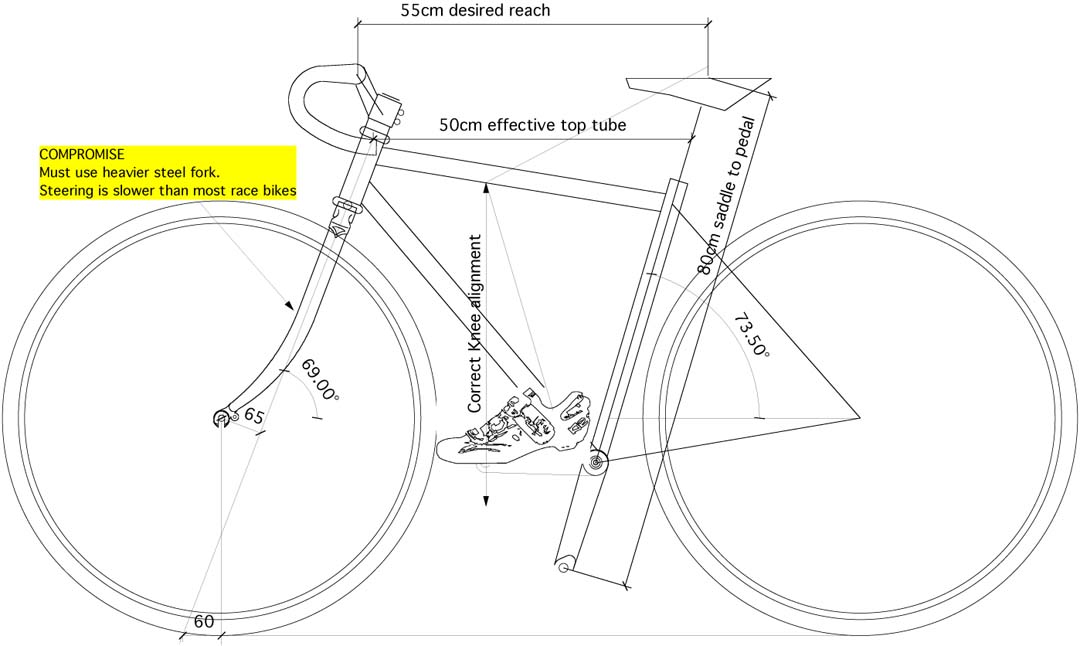
The very best way to put a 700c wheel on a smaller bike is the same way that we used to do it in the 1970’s and 1980’s…..use a steel fork. By using a steel fork, we have the option to put a custom amount of rake in the fork to offset a slack steering angle. This keeps the handling characteristics correct, and allows us to build to the proper fit and knee angle.

Proportional wheels are always going to give the bike better handling, but this compromise will allow those who really want 700c on a small bike to have them. The drawbacks to this option are that the fork ends up being heavier, and you still have some issues related to large wheels on a smaller bike. Read what what a serious athlete of smaller stature has to say on that subject.

On the top, you can see that this bike looks normal to the untrained eye. Actually, it looks (and rides) a lot like the an old Peugot or Raleigh from the 1970’s. On the bottom, you can see that it results in pretty satisfactory numbers as well. This option is preferable to 3 previous options, but doesn’t really provide the petite rider with the same level of quick handling and control that the taller riders get on their bikes.

frame drawing with a custom fork

Pointing out on the same drawing at left the custom fork angles


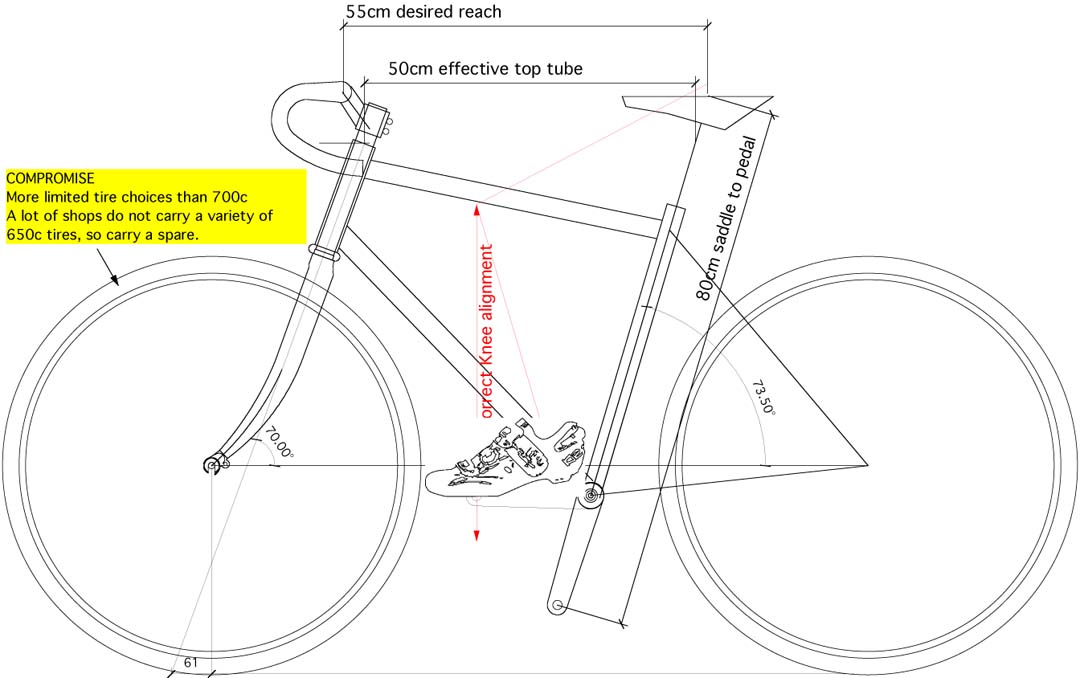
Compromise 5, Perfectly Proportional but more limited selection of tires
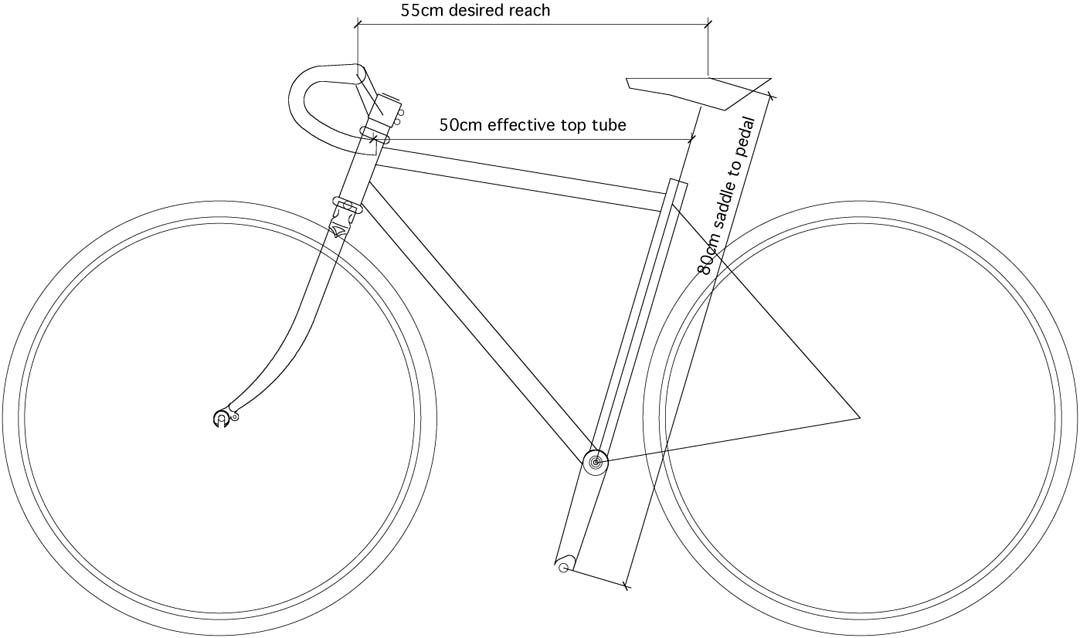
The very best way to build a smaller bike considering handling, comfort, fit, and speed is to use wheels that are proportional to the frame size. Using a 650c wheel allows the builder to correct for all of the drawbacks listed above and use lighter wheels and carbon fork as desired.

The drawbacks to 650c wheels are that your tire choices are more limited. The cycling industry ignores the needs of female cyclists to a very large extent, and stocking 650c tires just isn’t cool. If you ride widths from 23mm to 28mm, and you don’t mind carrying a spare, then you’ll have no problems with 650c.

On the top, you can see that this bike looks well designed and proportional. On the bottom, you can see that all of the fit measurements are right, as well as the handling geometry. The only compromise being a more limited tire selection. The petite rider can experience the exact same performance and control as taller riders do on their bikes.

Frame drawing with a 650c wheelset

Frame drawing with 650 wheels showing no toe overlap, normal trail numbers and a proportional top tube length


There you have it. A full graphic illustration of the ups and downs of wheel sizes and smaller bikes. A lot of smaller riders and women get a lot of advice from friends who ride, but aren’t actually bike designers. We’re happy to build your smaller bike with 700c or 650c wheels. I think that it’s important that you consider the differences as explained by someone who designs bicycles for a living.


Related Items

Small Bike Compromise: Sacrifice Convenience?

This is part 6 of 8. Here is the start!
A quick overview of terms that are important:

  • Fork Rake – Offset that places the fork ends ahead of the steering axis
  • Head Tube Angle – The angle that the frame holds the fork at in relation to the ground (same as steering angle)
  • Trail – The distance that the axle trails the steering axis intersection with the ground
  • Effective Top Tube Length – The measurement from the center of the seat post to the center of the head tube when measured level
  • Reach to Bars – Distance from center of seat to center of handle bar stem
  • Proper Knee Alignment – Adjustment to ensure that your knee is centered over the pedal spindle
  • Seat Tube Angle – The angle of the seat tube in relation to the ground
  • Toe Strike – How much of the foot interferes with turning the front wheel

A Bike with 650c wheels, proportional to the frame

Compromise 5.) Sacrifice convenience:
Here’s an idea….why not go to the extra expense and use a proportional sized wheel on the bikes that are smaller? This is the method that companies use when they are trying to provide the best fitting bikes without compromising safety or good performance. It also costs more for the manufacturer, and requires commitment and understanding of their customer’s needs. 650c wheels provide a world of design upgrades to the shorter rider, and should not be mis-understood.

That being said, there is a drawback to them. The drawback is that there are fewer tire choices for 650c, and there are not a lot of shops that stock 650c tires. So, you’ll want to have a spare if you’re on a long tour. Other than that, there are no drawbacks to a 650c vs. a 700c tire.


Now, I realize that some customers want special tires or rims that are only available in 700c, and are willing to sacrifice the weight or performance of proportional wheels, and I have no argument with that. We’re happy to, and do build a lot of smaller bikes with 700c wheels. I do have an argument with shops that say things like “smaller wheels are slower”, or “there’s no compromise in it” when science and physics prove differently. Facts are stubborn things I guess.

Alright! Women and shorter riders, you make the decision. Do you want the same comfort, control and performance as the taller riders get? Or, would you rather have the same wheel size that the taller riders get? It doesn’t matter to us, as long as you are making an educated decision.


WOW! Are you still reading this? If so, you’ve probably got more questions. I’m happy to answer any of them regarding this issue. I’m dumbfounded as to why some folks out there almost get angry about this subject, but it seems like they do. Back in the days before 650c wheels were common, we used to use 24″ wheels for small bikes. Imaging how mad that would make those people ๐Ÿ™‚ Anyway, shoot me an email if you have any questions about this article. It’s a technical article, and really could be a book if I went into every aspect of the issue. Suffice it to say, that if you grasp the facts in this article, you’ll be way ahead of many folks I meet in this industry.

Small Bike Compromise: Sacrifice Bike Weight!

This is part 5 of 8. Here is the start!
A quick overview of terms that are important:

  • Fork Rake – Offset that places the fork ends ahead of the steering axis
  • Head Tube Angle – The angle that the frame holds the fork at in relation to the ground (same as steering angle)
  • Trail – The distance that the axle trails the steering axis intersection with the ground
  • Effective Top Tube Length – The measurement from the center of the seat post to the center of the head tube when measured level
  • Reach to Bars – Distance from center of seat to center of handle bar stem
  • Proper Knee Alignment – Adjustment to ensure that your knee is centered over the pedal spindle
  • Seat Tube Angle – The angle of the seat tube in relation to the ground
  • Toe Strike – How much of the foot interferes with turning the front wheel

More detail of a steel fork solution

Compromise 4.) Sacrifice weight:
Let’s go old school, and use a steel fork like in the 1980’s. This is a pretty good option if you really want to use 700c wheels on a smaller bike. We can build a bike just like we used to in the 1980’s, and put lots of rake in the fork to match the slack steering angle to keep the trail number at 60mm. Although the steel fork is heavier than modern carbon forks, the bike will be comfortable to ride and you won’t hit your foot on the wheel when you try to turn. The handling of a bike like this is still not what most people are after on race bikes, as the ‘front center number’ (another article) is more like a 1980’s Peugot, but the bike is safe.

This compromise is the one we recommend for smaller riders wanting big wheels. If you want to feel a bike set up this way in comparison to a 650c wheel bike, just ask and we’ll let you try them both on extended test rides.

Monday: Sacrifice convenience?

Small Bike Compromise: Sacrifice Performance!

This is part 4 of 8. Here is the start!
A quick overview of terms that are important:

  • Fork Rake – Offset that places the fork ends ahead of the steering axis
  • Head Tube Angle – The angle that the frame holds the fork at in relation to the ground (same as steering angle)
  • Trail – The distance that the axle trails the steering axis intersection with the ground
  • Effective Top Tube Length – The measurement from the center of the seat post to the center of the head tube when measured level
  • Reach to Bars – Distance from center of seat to center of handle bar stem
  • Proper Knee Alignment – Adjustment to ensure that your knee is centered over the pedal spindle
  • Seat Tube Angle – The angle of the seat tube in relation to the ground
  • Toe Strike – How much of the foot interferes with turning the front wheel

Compromise 3.) Sacrifice performance:
More detail on a slack headtube

If the head tube angle is made very slack, say 68 degrees or less, that will usually be enough to get the 700c wheel out of the way of the foot of most people who need a top tube of less than 53cm, even with a modern carbon fork. “Why not just do that?” you ask? Well, remember ‘trail’? In short, if a bike has a very slack head tube angle, but not enough rake in the fork, the steering is affected in a very negative way. It shoots up to over 100mm on some expensive custom bikes. In other words, you won’t be been doing the ‘look ma, no hands’ trick unless it’s followed by the ‘look ma, no teeth’ trick.

This compromise will result in a bike that handles like a 1966 Ford pickup with no power steering. The bike will be hard to control in tight corners, and just not as much fun as it should be. Having to put so much energy into steering creates pains in the neck, hands, shoulders, and arms. This is all the opposite of what Rodriguez philosophy of cycling is about.

Tomorrow: Compromise the weight of your bike?
Read more about it!

Small Bike Compromise: Trickery!

This is part 3 of 8. Here is the start!
A quick overview of terms that are important:

  • Fork Rake – Offset that places the fork ends ahead of the steering axis
  • Head Tube Angle – The angle that the frame holds the fork at in relation to the ground (same as steering angle)
  • Trail – The distance that the axle trails the steering axis intersection with the ground
  • Effective Top Tube Length – The measurement from the center of the seat post to the center of the head tube when measured level
  • Reach to Bars – Distance from center of seat to center of handle bar stem
  • Proper Knee Alignment – Adjustment to ensure that your knee is centered over the pedal spindle
  • Seat Tube Angle – The angle of the seat tube in relation to the ground
  • Toe Strike – How much of the foot interferes with turning the front wheel

More detail of drastic frame changes

Compromise 2.) Resort to Trickery:
Here’s a tricky one. If a bike has a modern carbon fork, a 70 degree head tube angle, a top tube length of 50cm, no toe strike, fairly decent trail of 79mm, and 700c wheels, has the company found the magic formula? No. They have artificially shortened the top tube by making the seat tube angle really steep. What does this mean for the rider? Really sore knees, or the seat pushed all the way back on the rails in order to get the knees in the right pedaling position. Once the seat is pushed back on the rails to accommodate for thigh length, the reach to the bars becomes the same as if the top tube were 53 or 54cm, and the rider is just as uncomfortable. Why do this at all? To list a 50cm top tube in the catalog. Many, many manufacturers pull this stunt. I call this misleading ๐Ÿ™

Result – This one’s really not a compromise at all. You just end up with a bad fit, and bad design. Same as Really bad option number 1 with a little knee pain thrown in as an extra treat. Discomfort and pain always results in slower riding, and that’s one thing that everyone can agree on.

Important Note: Make absolutely sure that your salesperson uses a plumb line on your knee to ensure proper knee alignment. If they don’t use a plumb line, then leave without purchasing the bike as you are not dealing with an experienced bicycle fitter. If the bike you are riding has an extremely steep seat angle, chances are you’ll need a lot of attention to your knee position. I strongly recommend several rides before committing to a bike with a steep seat angle. A 15 minute test ride will not be long enough for any knee issues to arise.

Tomorrow: Do you want to Sacrifice Performance?
Find out Here!


Related Items

Small Bike Compromise: Wipe-Out!

This is part 2 of 8. Here is the start!
A quick overview of terms that are important:

  • Fork Rake – Offset that places the fork ends ahead of the steering axis
  • Head Tube Angle – The angle that the frame holds the fork at in relation to the ground (same as steering angle)
  • Trail – The distance that the axle trails the steering axis intersection with the ground
  • Effective Top Tube Length – The measurement from the center of the seat post to the center of the head tube when measured level
  • Reach to Bars – Distance from center of seat to center of handle bar stem
  • Proper Knee Alignment – Adjustment to ensure that your knee is centered over the pedal spindle
  • Seat Tube Angle – The angle of the seat tube in relation to the ground
  • Toe Strike – How much of the foot interferes with turning the front wheel

Wipe-Out!
More detail of Toe Overlap
Compromise 1.) I call this one Wipe-out
Believe it or not, there are manufacturers that say ‘toe-strike’ is not an issue. So, they just build the small bikes to the same handling characteristics as the large bikes. 60mm of trail, 72 degree head tube angle, 40 ~ 45mm or fork rake, 73.5 degree seat angle, 50cm top tube, and toes be dammed. Massive toe strike like the photo shown above in this article is common place with some major race bike manufacturers.

This picture is one I took when the customer brought the bike in because of crash damage. He didn’t know why he crashed, he only know that he had swerved to miss a car door that was opened suddenly in front of him. I’ll bet you can figure out how he crashed. We quit offering bikes built with massive toe-strike because of our money back guarantee. So many people who thought it would be fine, decided that they were not fine with a lot of toe strike and returned the bicycle to us for a complete refund. Nothing speeds up design upgrades like a money back guarantee I’ll tell you!

I urge you to check any bike that you are considering purchasing for acceptable level of toe-strike before you buy it. A 15 minute test ride won’t do either. If you’re going to accept a bunch of toe-strike, you should ride the bike on your regular route a few times before you buy it. As far as I know, we are the only manufacturer who will buy back a bike that the customer is not satisfied with. With most manufacturers, you bought it, it’s yours! There are a lot of women and shorter riders out there that have listed a bike on Craigslist after discovering that they were afraid to ride it because of toe-strike.

Tomorrow: Would manufacturers resort to Trickery?
Find out here!