Small Bike Compromise: Sacrifice Bike Weight!

This is part 5 of 8. Here is the start!
A quick overview of terms that are important:

  • Fork Rake – Offset that places the fork ends ahead of the steering axis
  • Head Tube Angle – The angle that the frame holds the fork at in relation to the ground (same as steering angle)
  • Trail – The distance that the axle trails the steering axis intersection with the ground
  • Effective Top Tube Length – The measurement from the center of the seat post to the center of the head tube when measured level
  • Reach to Bars – Distance from center of seat to center of handle bar stem
  • Proper Knee Alignment – Adjustment to ensure that your knee is centered over the pedal spindle
  • Seat Tube Angle – The angle of the seat tube in relation to the ground
  • Toe Strike – How much of the foot interferes with turning the front wheel

More detail of a steel fork solution

Compromise 4.) Sacrifice weight:
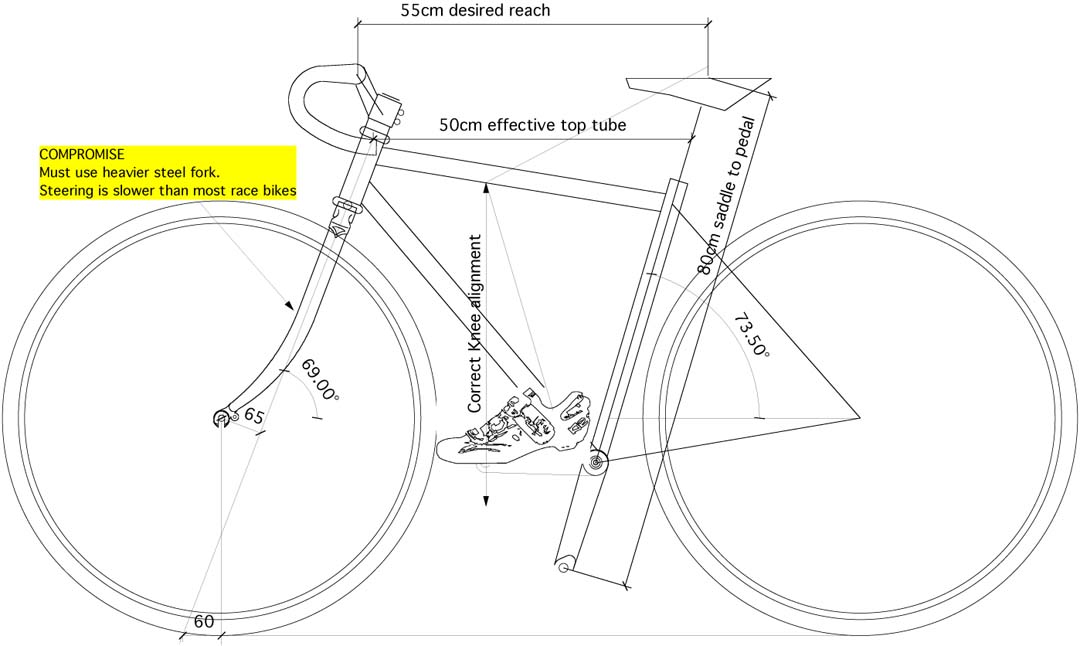
Let’s go old school, and use a steel fork like in the 1980’s. This is a pretty good option if you really want to use 700c wheels on a smaller bike. We can build a bike just like we used to in the 1980’s, and put lots of rake in the fork to match the slack steering angle to keep the trail number at 60mm. Although the steel fork is heavier than modern carbon forks, the bike will be comfortable to ride and you won’t hit your foot on the wheel when you try to turn. The handling of a bike like this is still not what most people are after on race bikes, as the ‘front center number’ (another article) is more like a 1980’s Peugot, but the bike is safe.

This compromise is the one we recommend for smaller riders wanting big wheels. If you want to feel a bike set up this way in comparison to a 650c wheel bike, just ask and we’ll let you try them both on extended test rides.

Monday: Sacrifice convenience?

Small Bike Compromise: Sacrifice Performance!

This is part 4 of 8. Here is the start!
A quick overview of terms that are important:

  • Fork Rake – Offset that places the fork ends ahead of the steering axis
  • Head Tube Angle – The angle that the frame holds the fork at in relation to the ground (same as steering angle)
  • Trail – The distance that the axle trails the steering axis intersection with the ground
  • Effective Top Tube Length – The measurement from the center of the seat post to the center of the head tube when measured level
  • Reach to Bars – Distance from center of seat to center of handle bar stem
  • Proper Knee Alignment – Adjustment to ensure that your knee is centered over the pedal spindle
  • Seat Tube Angle – The angle of the seat tube in relation to the ground
  • Toe Strike – How much of the foot interferes with turning the front wheel

Compromise 3.) Sacrifice performance:
More detail on a slack headtube

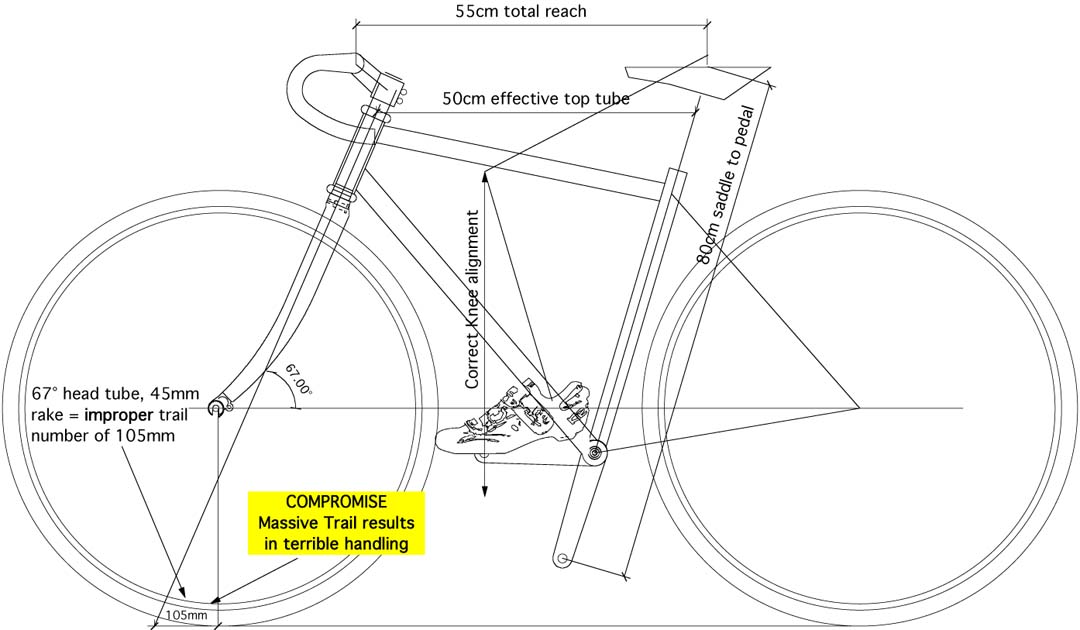
If the head tube angle is made very slack, say 68 degrees or less, that will usually be enough to get the 700c wheel out of the way of the foot of most people who need a top tube of less than 53cm, even with a modern carbon fork. “Why not just do that?” you ask? Well, remember ‘trail’? In short, if a bike has a very slack head tube angle, but not enough rake in the fork, the steering is affected in a very negative way. It shoots up to over 100mm on some expensive custom bikes. In other words, you won’t be been doing the ‘look ma, no hands’ trick unless it’s followed by the ‘look ma, no teeth’ trick.

This compromise will result in a bike that handles like a 1966 Ford pickup with no power steering. The bike will be hard to control in tight corners, and just not as much fun as it should be. Having to put so much energy into steering creates pains in the neck, hands, shoulders, and arms. This is all the opposite of what Rodriguez philosophy of cycling is about.

Tomorrow: Compromise the weight of your bike?
Read more about it!

Small Bike Compromise: Trickery!

This is part 3 of 8. Here is the start!
A quick overview of terms that are important:

  • Fork Rake – Offset that places the fork ends ahead of the steering axis
  • Head Tube Angle – The angle that the frame holds the fork at in relation to the ground (same as steering angle)
  • Trail – The distance that the axle trails the steering axis intersection with the ground
  • Effective Top Tube Length – The measurement from the center of the seat post to the center of the head tube when measured level
  • Reach to Bars – Distance from center of seat to center of handle bar stem
  • Proper Knee Alignment – Adjustment to ensure that your knee is centered over the pedal spindle
  • Seat Tube Angle – The angle of the seat tube in relation to the ground
  • Toe Strike – How much of the foot interferes with turning the front wheel

More detail of drastic frame changes

Compromise 2.) Resort to Trickery:
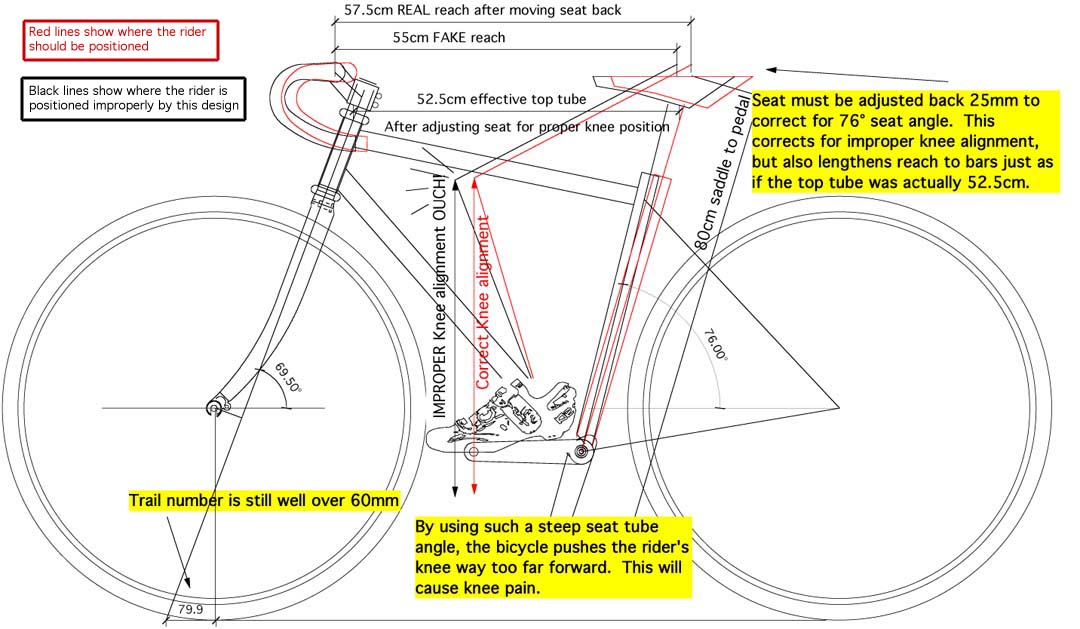
Here’s a tricky one. If a bike has a modern carbon fork, a 70 degree head tube angle, a top tube length of 50cm, no toe strike, fairly decent trail of 79mm, and 700c wheels, has the company found the magic formula? No. They have artificially shortened the top tube by making the seat tube angle really steep. What does this mean for the rider? Really sore knees, or the seat pushed all the way back on the rails in order to get the knees in the right pedaling position. Once the seat is pushed back on the rails to accommodate for thigh length, the reach to the bars becomes the same as if the top tube were 53 or 54cm, and the rider is just as uncomfortable. Why do this at all? To list a 50cm top tube in the catalog. Many, many manufacturers pull this stunt. I call this misleading 🙁

Result – This one’s really not a compromise at all. You just end up with a bad fit, and bad design. Same as Really bad option number 1 with a little knee pain thrown in as an extra treat. Discomfort and pain always results in slower riding, and that’s one thing that everyone can agree on.

Important Note: Make absolutely sure that your salesperson uses a plumb line on your knee to ensure proper knee alignment. If they don’t use a plumb line, then leave without purchasing the bike as you are not dealing with an experienced bicycle fitter. If the bike you are riding has an extremely steep seat angle, chances are you’ll need a lot of attention to your knee position. I strongly recommend several rides before committing to a bike with a steep seat angle. A 15 minute test ride will not be long enough for any knee issues to arise.

Tomorrow: Do you want to Sacrifice Performance?
Find out Here!


Related Items

Small Bike Compromise: Wipe-Out!

This is part 2 of 8. Here is the start!
A quick overview of terms that are important:

  • Fork Rake – Offset that places the fork ends ahead of the steering axis
  • Head Tube Angle – The angle that the frame holds the fork at in relation to the ground (same as steering angle)
  • Trail – The distance that the axle trails the steering axis intersection with the ground
  • Effective Top Tube Length – The measurement from the center of the seat post to the center of the head tube when measured level
  • Reach to Bars – Distance from center of seat to center of handle bar stem
  • Proper Knee Alignment – Adjustment to ensure that your knee is centered over the pedal spindle
  • Seat Tube Angle – The angle of the seat tube in relation to the ground
  • Toe Strike – How much of the foot interferes with turning the front wheel

Wipe-Out!
More detail of Toe Overlap
Compromise 1.) I call this one Wipe-out
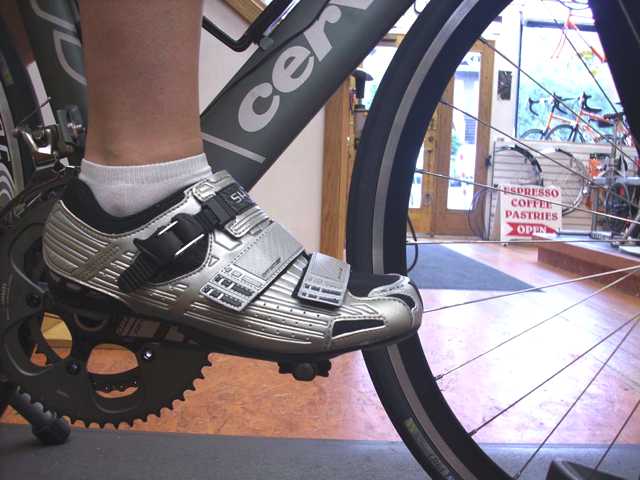
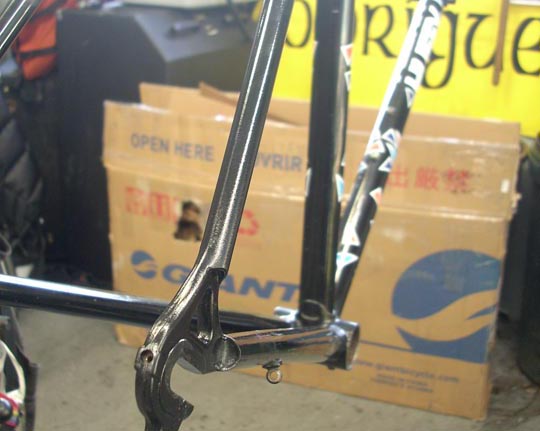
Believe it or not, there are manufacturers that say ‘toe-strike’ is not an issue. So, they just build the small bikes to the same handling characteristics as the large bikes. 60mm of trail, 72 degree head tube angle, 40 ~ 45mm or fork rake, 73.5 degree seat angle, 50cm top tube, and toes be dammed. Massive toe strike like the photo shown above in this article is common place with some major race bike manufacturers.

This picture is one I took when the customer brought the bike in because of crash damage. He didn’t know why he crashed, he only know that he had swerved to miss a car door that was opened suddenly in front of him. I’ll bet you can figure out how he crashed. We quit offering bikes built with massive toe-strike because of our money back guarantee. So many people who thought it would be fine, decided that they were not fine with a lot of toe strike and returned the bicycle to us for a complete refund. Nothing speeds up design upgrades like a money back guarantee I’ll tell you!

I urge you to check any bike that you are considering purchasing for acceptable level of toe-strike before you buy it. A 15 minute test ride won’t do either. If you’re going to accept a bunch of toe-strike, you should ride the bike on your regular route a few times before you buy it. As far as I know, we are the only manufacturer who will buy back a bike that the customer is not satisfied with. With most manufacturers, you bought it, it’s yours! There are a lot of women and shorter riders out there that have listed a bike on Craigslist after discovering that they were afraid to ride it because of toe-strike.

Tomorrow: Would manufacturers resort to Trickery?
Find out here!

650c vs 700c

Today’s subject: 650c vs. 700c wheels on smaller bikes

Related Items
Find wider 650c tires at
650biketires.com


See photo galleries of 650c bikes at www.rodbikes.com

A quick word about wheel size: 650c is a smaller size than 700c. It’s a not a huge amount (We get into that in a few days) but it’s certainly visually noticeable when next to each other.

This is a series of eight articles that we’ve put together to explain the challenges that bicycle manufacturers face when building bicycles for petite cyclist with big wheels. It should put to rest several myths by educating you in the area of bicycle geometry as it relates to fit, safety, handling and practicality. These articles may seem basic to those in the industry, but are written for those not in the industry. Over the next several days, we will post, one at a time, the series. Thanks for reading, and I hope the information is helpful for any petite cyclists out there that are being bombarded with conflicting advice.
Now on to the overview and reasons for the series.

The quick overview of this series for those who don’t need massive amounts of info

Although they can be made to look normal, 700c wheels on a small bike always results in one or more unavoidable compromises.

Although 650c wheels allow us to design a smaller bike to handle great and fit comfortably, they do result in a few compromises.

Obviously if there were no downside to 700c on every bike, then that’s all we would offer. But, there are several drawbacks, and that’s why we offer 650c wheels as an option for smaller bikes.

Now, maybe you want to really understand the subject before you commit? Maybe you’re the type that needs to arm yourself with some technical facts before you brave the conversation with ‘the bike expert’. For those of you who really want to have a grasp on the subject, I’ve written more….a lot more.

Who this series is for:

  1. Anyone who is under 5′ 5″ tall (especially women), has long legs, and is shopping for a bicycle.
  2. Anyone who is advising someone who is under 5′ 5″ tall about bicycles and what to look for when selecting the proper size.
  3. Anyone who likes to read nitty gritty details from the mind of a crazed bicycle frame designer who’s spent his entire adult life designing bicycles.

Terms you’ll want to understand for this series:

  • Fork Rake – Offset that places the fork ends ahead of the steering axis
  • Head Tube Angle – The angle that the frame holds the fork at in relation to the ground (same as steering angle)
  • Trail – The distance that the axle trails the steering axis intersection with the ground
  • Effective Top Tube Length – The measurement from the center of the seat post to the center of the head tube when measured level
  • Reach to Bars – Distance from center of seat to center of handle bar stem
  • Proper Knee Alignment – Adjustment to ensure that your knee is centered over the pedal spindle
  • Seat Tube Angle – The angle of the seat tube in relation to the ground
  • Toe Strike – How much of the foot interferes with turning the front wheel
Disclaimer: I’m not trying to sell anyone on a specific wheel size. Realize as you read this series, we are happy to build any size bike with any size wheel. I just want to show why we offer smaller wheels for those who need smaller bikes. We build small bikes with 700c wheels all the time as some people are willing to accept the performance compromises that are unavoidable.

Bike Industry Misinformation
There is a lot of misinformation that is spread throughout the cycling industry about bigger wheels and smaller wheels. There are reasons for this, but this article is about why we do what we do. If you want to delve further into the misinformation I go into that here. For those that have already heard it, and just want to get educated on the subject, read on.

Oh yeah, if someone at a bike shop tells you that 650c wheels are slow (it happens all the time), ask them if you can test ride one of their slow 650c wheel bikes to see for yourself. Chances are, they don’t have any, and probably have never even ridden one. Why would they have ridden a 650 bike if they are over 5’4″ tall? If you’ve been told this, and want to read more on the subject, that’s here.

Why Compromise? Well, sometimes you just have to.

If you ride a modern bicycle with a top tube shorter than 54cm, and the wheel size is 700c, you’re already compromising. This series is to inform you of the compromises that are made throughout the bicycle industry when designing bicycles for riders under 5′ 5″. It is very technical, and ventures into eye glazing geometries. If you read it well, and understand it, you will be more educated in the subject of bicycle design than most folks who actually work in the bicycle industry. My goal is to help the more petite cyclists among us make an educated decision based on physics and truth. Along the way, I’ve linked to some information that will dispel the myths that have been regurgitated for years in bike shops and magazine articles.

A stock frame from another company with 2 inches of toe overlap

Example of toe strike on smaller race bike


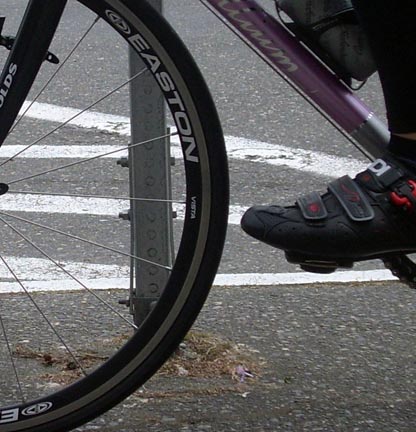
A Rodriguez built for the same size rider, with no toe overlap

Example of same size bike with no to strike

So, why do some bike manufactures suggest smaller wheels on smaller bikes?
Short answer: Because they want to offer the petite rider the same performance and comfort as they do the taller rider. It all boils down to something called Toe Overlap or Toe Strike:

If your front wheel overlaps and hits your foot when you turn, this is called ‘toe strike’. The smaller a frame becomes, the closer the front wheel gets to the rider’s foot. A small amount (maybe 1/4″ or so) of ‘toe strike’ can be common on modern race bikes, but more than 1/4″ can be quite a nuisance, or even dangerous, especially if the rider wants to use fenders.

Good Design
A smaller wheel allows us to produce a shorter reach frame with the proper head tube angle for good control while at the same time minimizing any, if not all, toe strike. Using a 700c wheel on a bike with an effective top tube of less than 53cm requires design gymnastics (or in some cases, cheating a little) to keep this from happening. Design gymnastics result in improperly fitted bikes, or bikes that handle poorly.


In the 1980’s smaller high performance bikes had 700c wheels. What happened to those good designs?

The Carbon Age – Now that carbon forks are the norm on just about all competition bikes, they must be purchased from manufacturers who do not offer products with rakes required to accommodate really slack head tube angles. If we could custom make carbon forks one at a time, the way we used to make steel forks, then we could pull this off, and our jobs would be easier.

Trail Mix
Something that most people don’t realize (including many who work in bike shops), is that there are good reasons for the head tube (steering) angle and fork rake as they relate to the handling characteristics of your bicycle. They are entwined with each other, and when one changes, so must the other. The trail number is dependent upon the combination of the two, and ignoring it will result in a bicycle that doesn’t handle properly. The desired trail number for most purposes is 60mm or somewhere very close to it.

If you want to have some real fun, ask your bicycle salesperson “what’s the trail on this bike?”. It’s a good way to determine the experience level of your salesperson.

Why did steel work better?
Steel forks offer much more flexibility for bicycle design. Years ago (1990 and before), we built lots of small bikes with 700c wheels and steel forks. We could change the head tube angle to a more ‘slack’ degree to move the wheel further out in front of the rider and then build the fork with more ‘rake’ to accommodate proper handling. The more ‘slack’ the head tube angle, the more ‘rake’ is required in the fork to maintain the appropriate ‘trail’ number of 60mm. The added rake moved the wheel out even further.

The very best way to put a 700c wheel on a smaller bike in 2012 is the same way that we used to do it in the 1970’s and 1980’s…..use a steel fork. By using a steel fork, we can keep the handling characteristics acceptable, and still build to the proper fit and knee angle.


The things I’ve seen:

Smaller bikes with 700c wheels and modern carbon forks have been made by many manufacturers, and I’ve probably seen them all in the repair shop. The compromises used are many. Here’s a list of the compromised designs I’ve seen:

Really bad option: No compromise, completely ignore proportions
Some manufacturers don’t even pretend. They simply make the small frames with a 54cm top tube, just like their bigger frames. So the reach to the handlebars for a 5′ tall rider is the same as the 5’8″ rider. Many women have ridden this way most of their lives, and they think bicycles just have to be uncomfortable.

I actually appreciate this approach simply because it doesn’t pretend to be something it’s not. This will provide the proper stand-over height, but a shorter rider’s reach to the bars will be a long trip and a very uncomfortable ride (sore neck, back, arms, shoulders, etc.). Many shorter riders know what I’m talking about as they’ve never been offered a proper fitting bicycle for most of their life.

Now, if you’re of smaller stature or need a top tube length less than 54cm, and you want your bike to fit right, there’s a number of compromises that you can choose from. Some of these compromises are much better than the others, and some are meant to fool you.

Tomorrow’s article:
Wipe-out! Some manufacturers are building dangerous bikes for their petite cyclists.

Click here to continue your study.

Related Items

Pioneers and Profits

Now that bicycles are hugely popular, I’m sure you’ve noticed that a lot of companies are getting into bicycle fitting of some kind or another. If you were to step back in time though, say… 30 years or so, you’d find that only a few very specialized companies had the passion to spend the time and resources to develop bicycle fitting technologies. One of these pioneer companies was, and still is, R+E Cycles right here in Seattle. For 38+ years we’ve been developing fitting technologies to make your cycling experience all it should be.

Next-Fit Logo


You know us for our Rodriguez and Trillium bicycles, but our bicycle lines actually grew out of our fitting techniques. Without the poorly fitting bicycles being sold all over the world, we couldn’t have performed over 50,000+ bicycle fits and collected the data to engineer our NEXT-fit™ Bicycle Fitting Software. Without the machines and experience of building bicycles, we couldn’t have created our NEXT-fit™ adjustable fitting bike. Without the data, and the adjustable bike, we couldn’t have engineered our 15 (now 18) production sizes of Rodriguez bicycles to fit as well as they do.

We are a different kind of bicycle company. Sure we spend time making our bikes light, but probably 90% of our development goes to making our bicycles fit our customers more comfortably. We’ve found that no amount of weight trimming or aerodynamics can replace a comfortable ride when it comes to speed on your bike.

Over the past 35 years, this philosophy has evolved into our own complete fitting system, the NEXT-fit™ system. The system includes software for accurate fitting suggestions for the professional, as well as a plethora of tools for accurate measurements. The crown jewel of the system is the only completely adjustable fitting bike made that can be adjusted by the fitter as the rider is riding.

Most of our customers are not professional racers, but ordinary people who want to enjoy a comfortable, high-end bicycle. It only makes sense to innovate with that in mind.

As a custom bicycle manufacturer (Rodriguez and Trillium), as well as a bicycle shop equipped with a computer programmer and a full machine shop, we have a unique approach to bicycle fitting.

A photographic sample of a NEXT-fit™ session is here.

Pioneering is very expensive, but we think our customers are worth it. That’s why we’ve dedicated huge resources over the years to improve our methods of adjusting bicycles for our customers. We have immediate feedback from thousands of clients, and we can make adjustments to our tooling or software on the fly. If you would like to read more about the NEXT-fit? system, I’ve written oodles of info and it even has its own web site. I’ve got photos of a NEXT-fit? session as well as sample forms that the software creates available for viewing on the site as well.

I’ve written a complete history of bicycle fitting here at R+E Cycles and it’s available here.

Rodriguez Custom Adjustable Fitting Bicycle


Stretch your Budget, not your Chain

Do you change the oil in your car? Most people will change the oil in their car every 3,000 to 4,000 miles as their manufacturer suggests. Why do they do it? It’s still oil when the mechanic drains it out of the engine right? Isn’t it still lubricating the parts inside the engine? But it is still drained out of the engine and brand new oil is poured in it’s place. The reason that the oil should be changed at a certain mileage is simply preventative maintenance. The engine would continue to run on the same oil for 10’s of thousands of miles, but slowly it would wear out, and the engine would become damaged. This is a much more expensive repair than regular oil changes.

The same is true for the chain on your bicycle. The chain on a bicycle is engaging on the gears in the front and rear. The chain is manufactured with exactly 1/2″ of space between each link, and the gears are precisely manufactured to ‘mesh’ with the chain. The chain is under incredible strain because of the force and leverage that a cyclist applies. The chain is also subject to sand and other road grime that collects and acts as an abrasive, wearing away the metal the chain is made of.

Even with these factors, a chain can last for 10’s of thousands of miles just like the oil in your car. But, over time, the chain will stretch. As the chain begins to stretch and is no longer 1/2″ between each link, it wears the metal from the teeth of the gears to match it’s new length. If a chain is allowed to stretch too far, it will wear all of the gears on the bicycle so much that they will not ‘mesh’ with a new chain. If a new chain is installed at this point, the chain will ‘slip’ on most of the worn gears and create a lot of rumbling noise on the others. Often a customer will come in with a chain that is so far stretched that the bike won’t shift well, or the chain may even be broken. At this point, all of the gears have to be replaced and the repair bill is much greater than it would have been if we had just replaced a chain earlier.

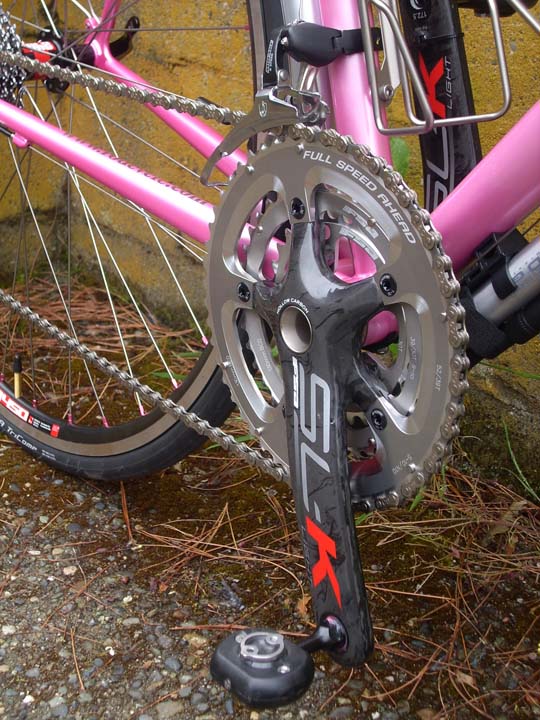
Drivetrain close up

What’s the recommendation? On modern bikes we are seeing people get about 1500 – 2000 miles before a new chain is recommended. On a tandem it’s more like 1000 – 1500 miles. I’ve seen some people get 3000 – 4000 miles with minimal stretch, but that’s the exception. I recommend that you start having your shop check your chain stretch at 1500 miles, and then every 500 miles after that. If you replace your chain at the first sign of stretch it will cost you about $30. If you wait until your rear cogs have to be replaced along with your chain it will run approx. $100. And if you wait until your chain just breaks and all of your gears need replacing it will run from $250 to $400 or more.

How many miles are on your chain?

Team Crest-Huffy

‘Steel’ on the road after all these years!

Dennis Bushnell holding a Raleigh 'funny bike' he's just finished buildingDennis in 1984 looking funny, holding an Olympic funny bike

A fleet of Team Crest bikes in Dennis' shop in 1990
Freshly built fleet of Custom Team Crest Bikes hang in Dennis’ shop – 1990


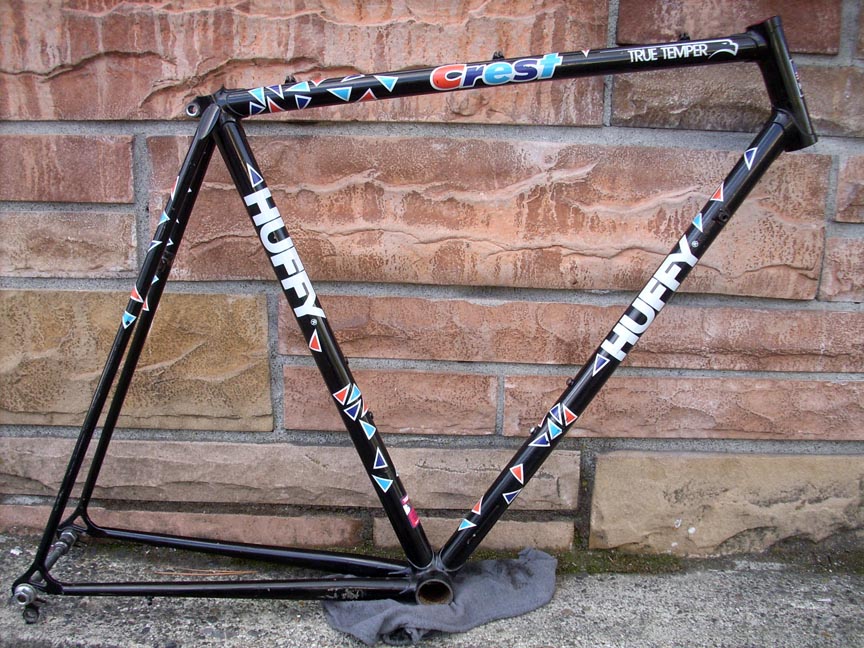
The Team Crest Huffy bike before repair
One of them makes their way back to R+E Cycles in 2011

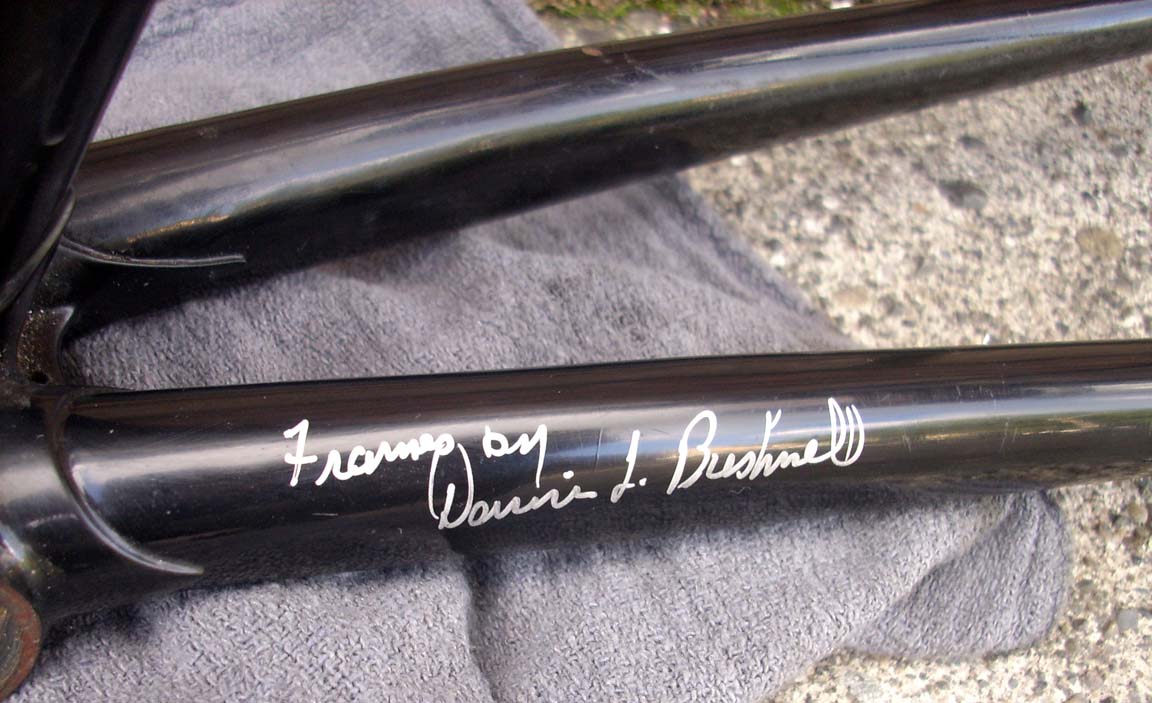
Dennis Bushnell's signature on the bike's chainstay
Dennis’ signature still in great shape on the chain stay


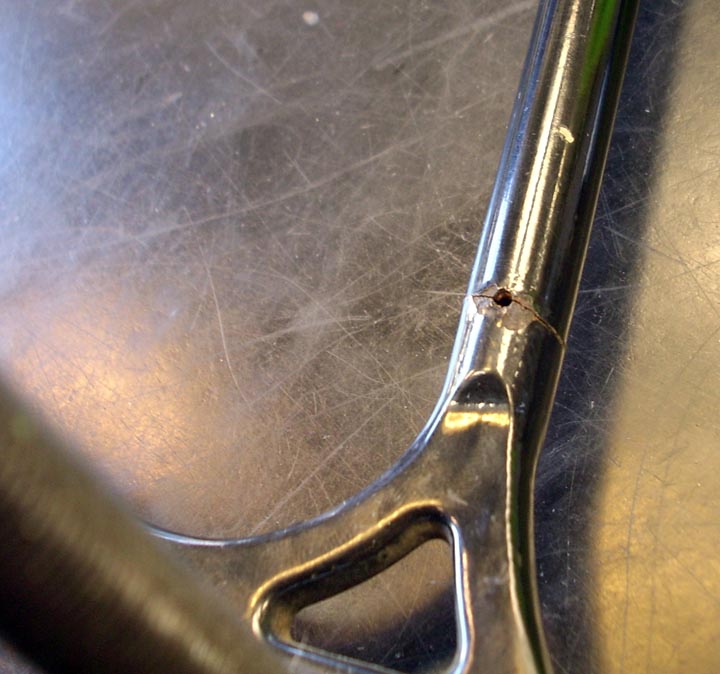
A crack in the seat stay on the Team Crest Huffy bike

After 2 decades, a small crack has appeared in the super thin tubing


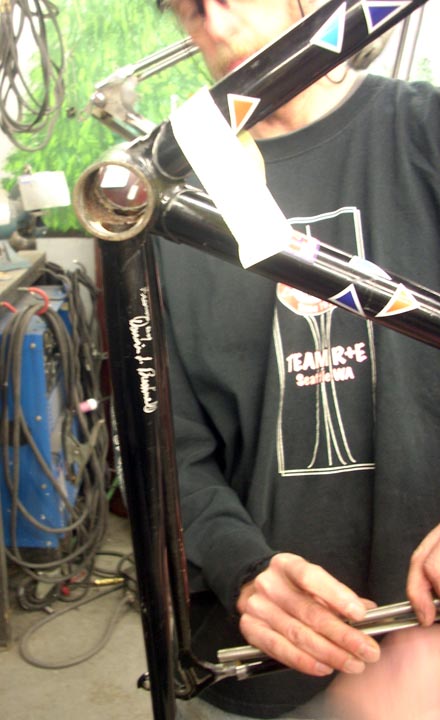
Willy checking seat stay's against the cracked one

Proper tubing is selected to replace the cracked section


A Picture of the repaired frame with no noticable paint damage

After a new seat stay, a little spray paint, the bike is ready for more action!

As you may or may not know, our head frame builder, Dennis Bushnell has long been respected as one of the finest bicycle frame builders in the United States. As long ago as 1984, he was selected to build the bicycles for the U.S. Olympic team.

It was no surprise that in 1990 he was asked to build a fleet of bikes for the Huffy Crest Team. The bikes were ridden by racers like Scott Moninger and others throughout the year. A few weeks ago, one of those frames found its way back to Dennis here at Rodriguez Bicycle company for a small repair.

I thought a quick article demonstrating the longevity of steel as a bicycle frame material was in order. Here’s a lugged steel frame that was built as light as possible for its day, and designed only to be raced professionally for a year. It certainly served that purpose, but then spent twenty more years on the road before a small crack developed.

The frame weighs just 3 pounds 14 ounces verified on a digital scale. For a 1990 frame, this is incredibly light. Now, I will say that there were plenty of aluminum and carbon bikes that weighed in just under 4 pounds in 1990 as well. Something to consider: How many of those world class carbon or aluminum frames built in 1990 do you see still on the road after being professionally raced? How many of them are on the road for 20 years? How many of them could be easily repaired and back on the road if they cracked? It’s just worth considering if you’re looking to ride your expensive custom bike for 20 years plus.

After selecting an appropriate new seat stay, we were able to repair the bike fully with very minimal damage to the classic paint job. This is just one of the beautiful things about a high quality steel frame. Even a high-performance steel frame built super light, can still be repaired decades down the road.


Bushnell, the Eccentric King!

Patent GraphicOur patent has been issued!
(To clarify, An eccentric bottom bracket is a part that is used to adjust the chain tension on any bicycle that has no derailleurs. Track bikes, Rohloff bikes and the chain between captain and stoker on tandems are the most common uses.)

How long does it take to get a patent? Apparently about 4 years.

Way back in early 2007 or so, we began the patent process for the now patented Bushnell® Eccentric bottom bracket. I didn’t know how long it would take, but as of December 6th, 2011 we have our patent! The patent number is U.S. Patent No. 8,070,633.

We’re thrilled to finally have the patent process completed. Production of this ingenious Dennis Bushnell creation continues uninterrupted. We manufacture several thousand of these each year right here in Seattle at the Rodriguez shop. It’s a true American manufacturing success story that’s seldom heard of anymore. We actually ship these parts to companies all over the world, including to Taiwan. That’s right! An American made bicycle part being shipped to Taiwan for use in bicycles.

The benefits of this light-weight, versatile design have been known throughout the tandem world for a long time. Now, with the onslaught of Rohloff equipped bikes and single speed bikes, the Bushnell® has really taken it’s position at the top of the industry! Congratulations to Dennis Bushnell on creating a design that is worthy of patenting!

I realize that the eccentric is a very specialized part, and not everyone wants to wade that deep into the muck, but I thought all of you would be interested in the fact that we now have a patent, and the parts will still be made in the U.S.A.

If you are hungry for knowledge though, and you’d like to read more about the Bushnell® eccentric (oh I’ve got more believe me), and why it’s the number one item in its class, read on.

Eccentric Thoughts from Rodriguez Bicycle Company.

Who Cares About Eccentric Bottom Brackets?


Rohloff, Tandem or Single Speed bike riders should.

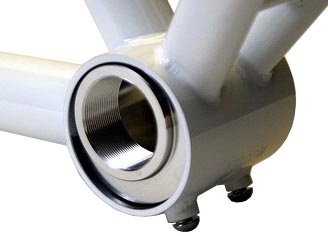
Each week, I get dozen’s of emails asking if they can upgrade their existing bicycle to our patented Bushnell® Eccentric Bottom Bracket. These are from people who’ve bought expensive single speed bikes, Rohloff equipped bikes, or tandems that use eccentric bottom brackets (referred to as EBB throughout this article). As they have examined their bike, they’ve discovered the fact that their bike came stock with an EBB that was designed in the the Fred Flinstone era. While this may have saved their frame builder a hundred dollars or so, it has no benefit for them, and actually makes their bike heavier, and harder to use. They discovered our design on-line, and want to know if they can retro-fit one into their custom bicycle. Most of the time, it is possible, but sometimes the bottom bracket shell that is used is too small to fit any EBB into the bike except for the one that came with it:-( For this reason, it’s important for you to find this out before you order your new frame.

In this article, I aim to help customers understand the different designs, so they can steer their frame builder to the eccentric that works best, not just the cheapest option. As a customer, it’s up to you to educate yourself on the different styles, and then ask your builder to use the one you want before the frame is built. Otherwise, they will usually choose the cheapest option. It’s an easy place to skimp if your customer doesn’t know any better right? Customer education has always been our friend here at Rodriguez Bicycles, and here’s a new area to focus on.


Note: All of the designs mentioned in this article, including the Bushnell®, are available to every frame builder through their standard frame building supply companies. Any reputable frame builder is able to build your frame to accept any design, but you have to express your preference.

The Bushnell® EBB


The Patented Bushnell® EBB is the most popular design on the market today.


The Bushnell® EBB is self contained. It does not rely on parts welded to the frame to hold it’s adjustment.

This is a product that we manufacture right here in our
shop in Seattle
. We ship them all over the world, and have distributors in England, Germany, and large accounts in Taiwan and Japan. Just last week I was notified that our patent will issue on December 6th, 2011! I thought an article about why this product exists, and why it’s better, was long overdue. There are several things that make the Bushnell® unique, but lets focus on the benefits to the user.

Safer Design:
The first benefit is the fact that the design does not use parts welded to the frame to hold it’s adjustment. That means if you get a little heavy handed, ‘reef’ to hard on the bolt and strip the threads, you’ve just stripped a nut, but have not damaged your frame. Every year we upgrade several people to Bushnell® EBBs after they’ve stripped the threads in their frame. Sometimes we even get a call from other bike manufacturers trying to help one of their own customers who’ve stripped their frame.

Ease of adjustment:
As you read through this article, you see that there are many eccentrics on the market, but only one Bushnell®. The Bushnell® was designed by Dennis Bushnell, our head frame builder, to address all of the design drawbacks of the other designs, and ease of adjustment was key. A 4mm alan wrench is all that is required to adjust your chain tension when you are using a Bushnell®. No hammers required (yes some require a hammer).

Light Weight
Although we’re not complete weight freaks, a lot of customers want the best performance and the lightest weight option. The Featherweight Bushnell® EBB is that answer at just 140grams. This is why it is used as the standard on light-weight tandems and other bikes in the industry.


There are massive differences between a $15 eccentric and a $160 eccentric

The Mark
(set pin) design ebb
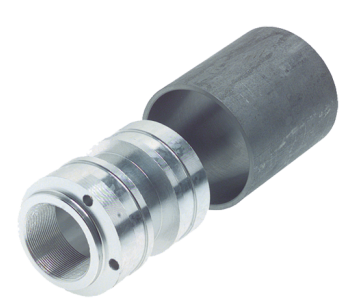


Mark leaves terrible divots in your ebb, making accurate adjustment almost impossible.


Benefits: Extremely inexpensive

Drawbacks: Harder to use, and not very reliable.

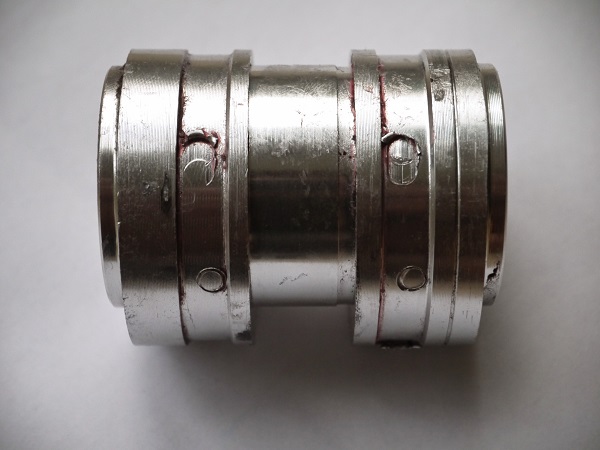
The first $15 option we’ll call Mark. Mark is a good name, because the design forces sharpened ‘set’ pins into a solid block of aluminum and leaves ‘marks’ all over it. I guess we could call it Scratch or Gouge, but Mark sounds more like a real name. It always finds it’s mark again, even though you’re trying to adjust it.

The eccentric itself is just a solid block of aluminum that the user rotates in the bottom bracket shell welded into the frame. The frame builder welds nuts onto the outside of the frame on the bottom bracket shell. You will use a wrench to drive the set pins through the nuts, and into the aluminum EBB. Once the hardened steel pins have created a deep divot into the softer aluminum EBB, it’s very hard to make a fine adjustment because the pins always try to turn the ebb right back to the divot.

Aside from being very difficult to use, the Mark design has very little surface contact so is the most likely to slip out of adjustment. This is because the amount of contact bewteen the frame and the aluminum ebb is very little. The set pins drive the unit against the top of the frame’s bottom bracket, so the points of contact are about 25% at the top, and the set pins themselves.

As if this is not enough, the Mark design is often rendered useless when a rider over-tightens a set pin and breaks the welded nut right off of the frame. The good news about the Mark design is that a Bushnell® EBB usually drops right in and works beautifully.


Here’s an example
of a custom titanium frame rescued with a Bushnell EBB. Every month we sell several Bushnell EBBs to customers who have the Mark design in their frame. I’m very surprised at how many manufacturers still use the Mark design in their $4,000+ bicycles.


Enter Evolution:

Modified Mark uses a ‘pinch bolt system’
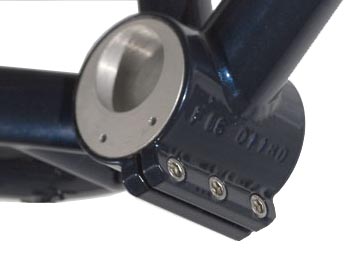


The second $15 option we’ll call modified Mark, as it’s really just an improved version of Mark. This is a design that we used to use ourselves way back in the mid 1980’s when it was the best option. It’s pretty much the same solid block of aluminum, but the frame has been cut, or slotted, where it holds the ebb and then a pinch bolt system has been brazed or welded onto the frame. When the pinch bolts are tightened, the frame ‘closes up’ around the aluminum ebb and holds it into place.

The Good News
The pinch bolt design holds it’s adjustment better than Mark because of the fact that there is full contact all the way around the aluminum EBB. It also doesn’t gouge ‘memory’ marks into the EBB so you can more easily make micro-adjusments.

The Bad News
Other than it’s relatively heavy weight, there are a few other drawbacks to this design. The biggest drawback is the fact that, like the Mark design before it, the bicycle frame is used as the method to actually hold the adjustment and not the EBB component itself. This means that if the pinch bolt breaks off of the frame, or the threads are stripped out, the fix is not an easy one, but one that requires frame work and re-painting. The next drawback is the fact that since the frame is split at the bottom bracket, an expanding design like the Bushnell® will not work in the frame unless frame modifications are made.


Let’s step forward to 1990 or so


The 1990’s brought the
split/wedge design


Adjustment required
know-how and a hammer


Here I am adjusting a Rodriguez tandem customer’s chain ‘on-the-road’ during the
1995 Tandem Rally
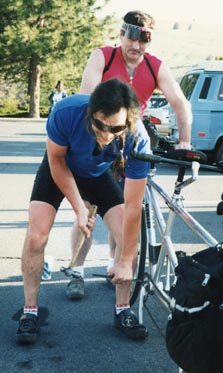

I can’t remember if it was the late 1980’s or the early 1990’s, but around that time Cannondale came up with a good design that we started to use instead of modified Mark.

We liked the design because it didn’t use threaded parts welded awkwardly to the frame to hold the adjustment, but was a self-contained unit. This meant that the frame was safe from the gorilla type torque that bike mechanics often applied to eccentric bottom brackets.

The design was similar to a handlebar stem with a wedge and a bolt that pulled the wedge into position tight against the bottom bracket shell. There was very good friction between the parts and the adjustment held extremely well. The design was heavy like the others, but all in all was nice looking in the frame, and kept the frames safe.

It was not without it’s problems though. The Cannondale wedge design required a very specific method to loosen it when you needed to adjust the chain. That technique? Hammering! “Woooh, wait a minute! Are you going to use that hammer on my bike?” Was a phrase anxiously hollered by customers watching me preparing to make an adjustment to their expensive tandem.

The design was not intuitive for most bike mechanics either. When you break a stem loose, you hit the stem bolt with a hammer, not the actual stem. For this reason, most bike mechanics who hadn’t seen one of these before, usually took a good ‘whack’ at the bolt after loosening it up like they would on a stem. Well, this would not loosen the eccentric, but rather drive the threads right out of the special nut required for the eccentric. I spent many hours on the phone (and still do) explaining to mechanics how to get one of these out of a bike after you’ve stripped the nut.

A better design was needed for expensive tandems.


That answer came in the form of the Bushnell® EBB.


The Patented Bushnell® EBB is the most popular design on the market today.


The Bushnell® EBB is self contained. It does not rely on parts welded to the frame to hold it’s adjustment.

Well we’ve come full circle. The patented Bushnell® EBB was designed by Dennis to specifically address every drawback in all of the above designs. It remains to this day the best selling EBB on the market. There is no substitute for the quality of engineering and construction of this American made product.

With the rise of popularity in single speed bikes and Rohloff equipped bikes (we’re the biggest Rohloff builder in the U.S.A.), the eccentric bottom bracket has new life. Dennis originally designed our EBB for tandems, and that’s why we have a big head start on every other manufacturer of EBBs. The fact that ours was in development for years means that you’re getting a product that’s tried and true. This goes for any bike that needs an EBB.

We stand behind the Bushnell® EBB just like we stand behind everything we make. When a Bushnell® EBB customer emails us for help, their talking directly to the folks that have designed, manufactured and assembled that part. Remember, demand the best for your custom bike. We think you’ll agree, that the Bushnell® EBB is that choice.

If you’d like to read an evolutionary history of the eccentric bottom bracket, click here.

Rediscovering Steel Race Bikes

Outlaw Guy Head Outline
If you’re curious about the specs on the bike mentioned in this article, here you go!

Another Convert

Dan – October 2011

Today while I was writing the Outlaw web page, a customer (let’s call him Steve) brought in his Cervelo R3 carbon bike for a new rear wheel and some various other work. Little did he know he was in for the ride of his life! You see, while we were gathering up the parts and building the wheel, Scott asked him if he still wanted to ride today? He said that he wanted to, but the bike wasn’t cooperating. It was a slow day in the shop, so Scott offered to loan him a bike for the afternoon. The customer agreed.

The bike that we loaned him was a Rodriguez Outlaw made with S3 tubing. This is a bike that is comparable in price and weight, and happened to have the same SRAM Red parts group that Steve had on his Cervelo R3.

Well, Steve road about 50 feet down the street and then back up again. “OMG!” he said, “this thing is incredible”. Scott made some final adjustments and told Steve to make sure and ride some hills that he was used to while he was out. “I’d like to know how it stacks up against the Cervelo R3” said Scott. The truth be told, we already knew how it stacked up.

Fast forward about 45 minutes and Steve rolls back up on the Outlaw. He said “I’m getting one of these!”. He decided that he would get the wheel now, and ride the Cervelo for a few more months. Then he took off down the road on the Cervelo.

Not so Fast?

Well, months turned into minutes as Steve is being fit for his Outlaw frame as I write this. Turns out 5 minutes on the Cervelo and he said to himself “I can’t ride this thing anymore”. He turned around, came right back to the shop, and ordered his Rodriguez Outlaw.

This is not the first time that we’ve had a customer make a conversion this fast, but since I was right in the middle of writing the Outlaw web page while this was going on, I thought an article was in order.

I’ve said over and over that a person really has to experience this bike. Even if you already own an expensive carbon bike, the Rodriguez S3 Outlaw is still a bike that you will find worth trying. I cant’s stress it enough… It’s THAT GOOD! It’s as light or lighter than his Cervelo, it’s faster than his Cervelo, and most importantly, it’s much more fun to ride that his Cervelo. If you want to see why Steve, and so many others have abanDoned their expensive carbon bike after riding one these, I dare you to give it a try.


Steve's new, lightweight Rodriguez S3
Update November, 2011 – Steve’s Bike looses 1/4 pound!

Now the bike is finished and Steve is enjoying it. The total weight of the bike is 4 ounces lighter with the steel Rodriguez Outlaw frame than it was with the Cervelo R3! The Cervelo was a very respectable 15.5 pounds, but the same parts on a Rodriguez Outlaw frame/fork weighs in at just 15.25 pounds. That’s even including a heavier saddle! Not only is Steve going to be more comfortable, he’s riding a lighter bike now. Not to mention how sweet his Outlaw looks! Seeing is believing….. click here.

To view the complete ultra-light steel bike race gallery here.

A lot of people ask me “how’d you do that?” when they lift one of our steel bikes. It’s hard from them to believe that a steel bicycle frame can be as light, or lighter than a carbon fiber frame. The fact is that we’ve been doing this for almost 40 years. Dennis Bushnell has tremendous experience in the field of building lightweight steel frames. Although the steel has evolved over the last several decades, our methods have too. Our frames are differenct because of that experience. If you think you might be like Steve, and want to try one of our ulrta-light steel bikes, give us a call at 206-527-4822 or shoot me an email today.